
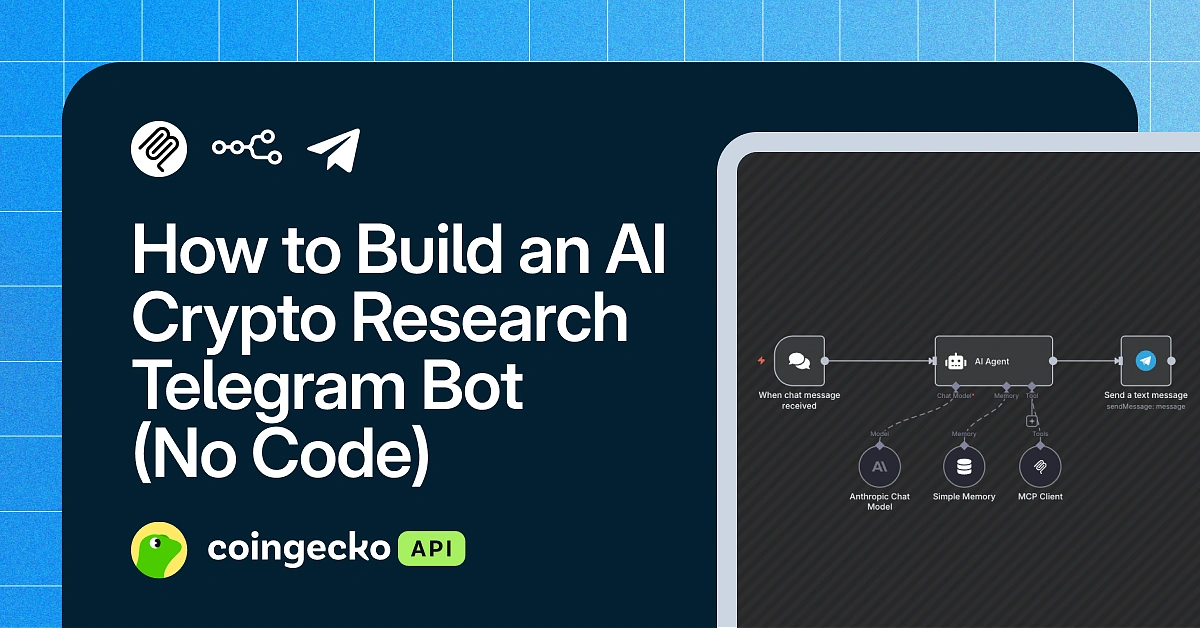
The AI landscape is evolving rapidly, disrupting how people research and consume information. It is also becoming easier to build tools, products, and automations with the help of AI. One of the most impactful use cases of AI in the crypto industry is crypto market research powered by AI bots and agents.
In this article, we’ll walk you through an easy-to-follow, step-by-step process to build an automated AI crypto research Telegram bot using n8n and real-time market data from CoinGecko MCP, powered by the CoinGecko API. This no-code solution is beginner-friendly and offers a great introduction to Agentic AI bots that you can start building today.
This tool is designed to save time and provide valuable information for crypto enthusiasts, traders, and investors seeking to enhance their research skills by leveraging AI bots and automated workflows.
We’ve also included a downloadable n8n AI workflow template at the end of the article, which you can use to get started quickly or adapt for your own use case.
Prerequisites:
Here’s what you’re going to need, in order to build your first AI crypto research bot:
- CoinGecko MCP
- Telegram Bot API Key
- OpenAI API key
- An n8n account
- Node.js (optional)
Configuring CoinGecko MCP
For our AI crypto telegram bot, we’ll be using CoinGecko’s free Public Remote MCP server. This doesn’t require any authentication or API key and is very easy to get started.
Obtaining a Telegram Bot API Key
To obtain your Telegram bot API key, open Telegram (desktop or mobile) and search for “@BotFather”, the official Telegram bot for creating and managing other Telegram bots.
Start a chat with BotFather and send the command /newbot. It will then prompt you first for a display name and then for a unique username ending in “bot”.
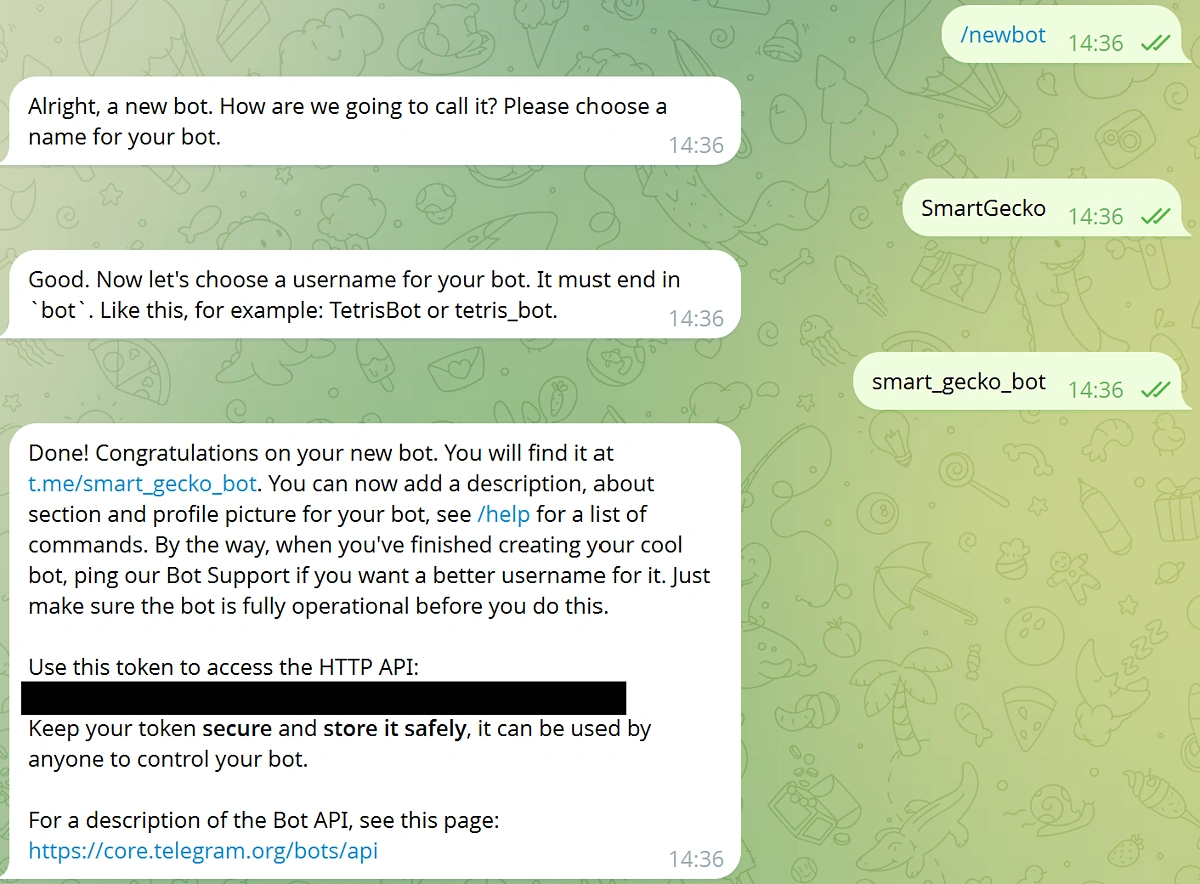
You’ll then receive a message that contains the access token (API key) for your Telegram bot. Store this securely for now, as you’re going to need it later on.
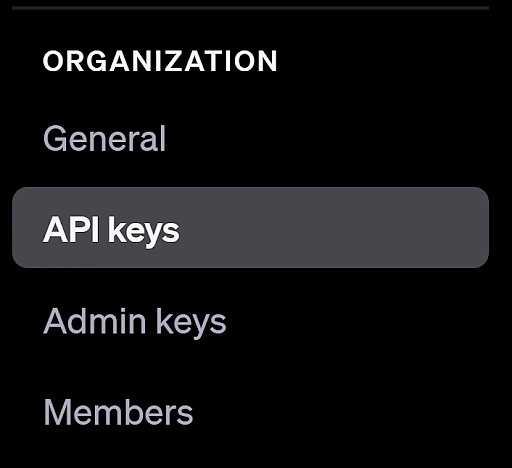
Obtaining an OpenAI API Key
To obtain an OpenAI API key, log in to your OpenAI account and navigate to API Keys under Organization.
Click +Create New Secret Key in the top right corner and copy the key.
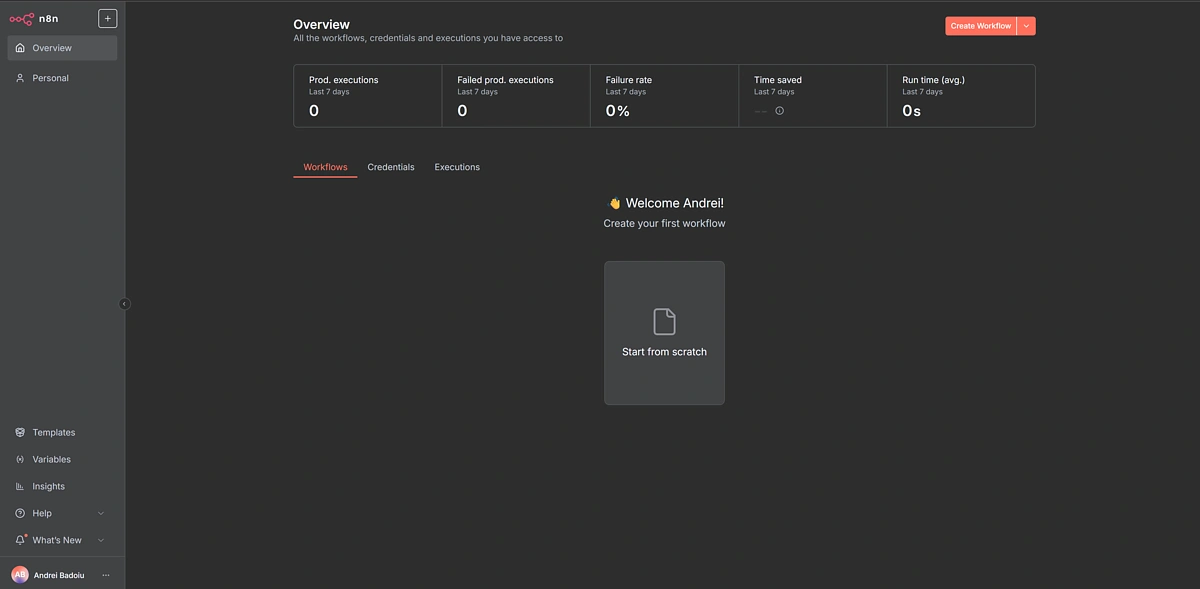
Setting up n8n
n8n is an open‑source, node‑based workflow automation tool that lets you visually connect apps, APIs, and data sources without writing code.
Because it’s open-source, you can either self-host n8n or sign up for their hosted solution – also known as n8n Cloud.
n8n Cloud
This is the easiest way to get started, and it comes with a 14-day free trial. Simply visit n8n and sign up for a new account.
Self‑Hosting n8n
One way to run n8n locally is by using Node.js.
First, you need to open a port so external services can reach your local n8n instance. This is required for integrations like the Telegram Message Trigger, which rely on incoming webhooks from external services.
A simple solution for this would be to use a tunneling service (like ngrok or localtunnel) and set the WEBHOOK_URL environment variable so those services can reach your workflows.
- Start by installing localtunnel: npm install -g localtunnel
- Then creating a tunnel for port 5678: lt –port 5678.
This will return a temporary URL that looks something like this: https://deep-ways-chew.loca.lt.
Open the URL in your browser, and paste your public IPV4 address in the password field if prompted. You can now copy the URL and deploy n8n with this as the WEBHOOK_URL environment variable.
To run it directly in Node, execute the following command in your command terminal or terminal:
set WEBHOOK_URL=https://deep-ways-chew.loca.lt && npx n8n
This will download and launch the latest n8n editor on port 5678 and configure it to use the tunnel you created. Simply navigate to http://localhost:5678/ in your browser, and you should see the n8n overview page.
💡Pro Tip: You can also install and run n8n locally using Docker for a more robust and portable set-up. This is especially useful if you plan to share it with a team or move it between machines.

Step 1: Building an AI Crypto Research Bot with n8n
To create your first AI workflow, open your n8n instance and hit Create Workflow to get started.
Adding a Trigger
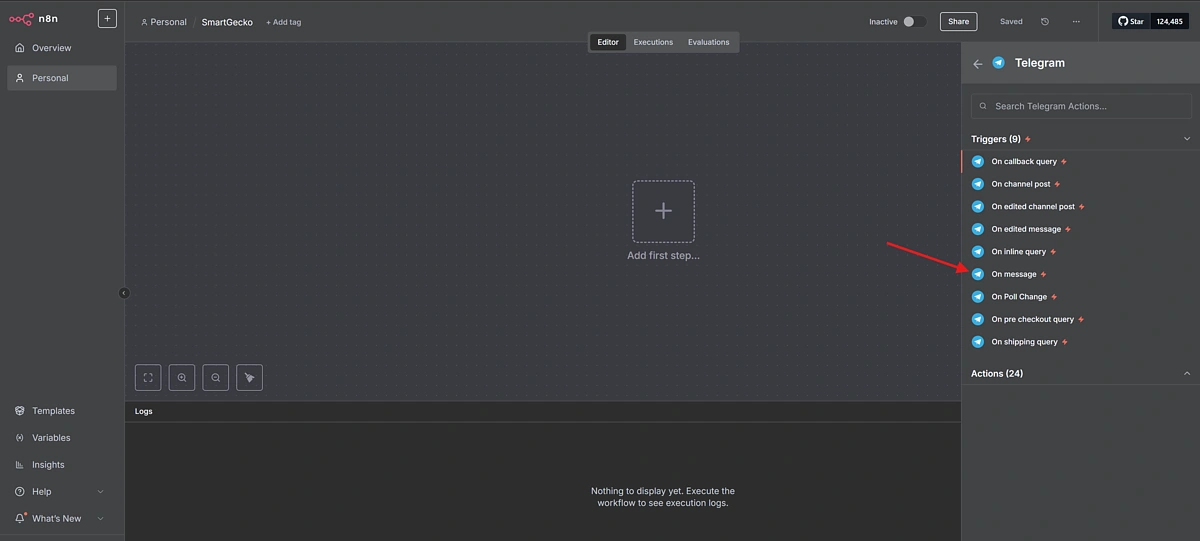
The first thing you need to do is add a trigger. This determines how your AI bot will start executing. We want our workflow to start executing every time our Telegram bot receives a message.
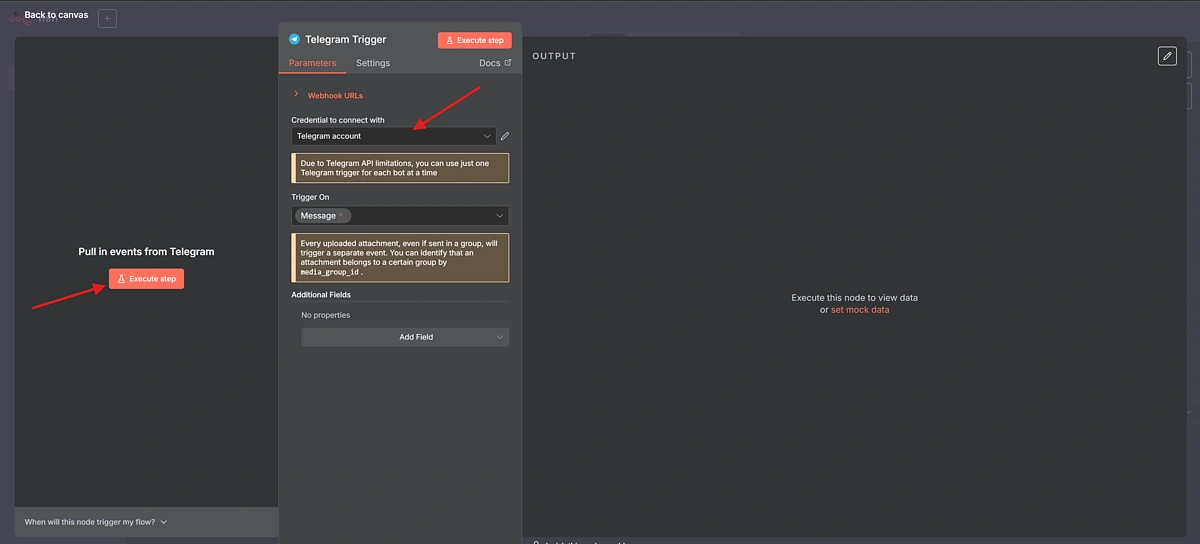
To do this, select the On Message trigger from the list of Telegram triggers.
Selecting this trigger will open a new window prompting you to select your Telegram credentials. Since you likely don’t have any credentials saved in n8n yet, choose + Create new credential from the dropdown.
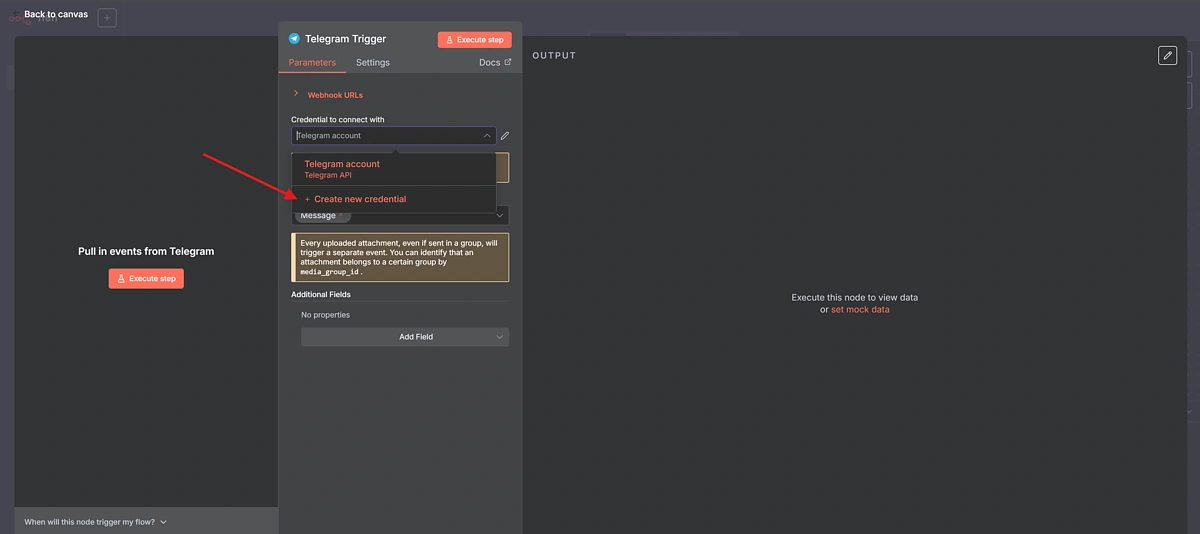
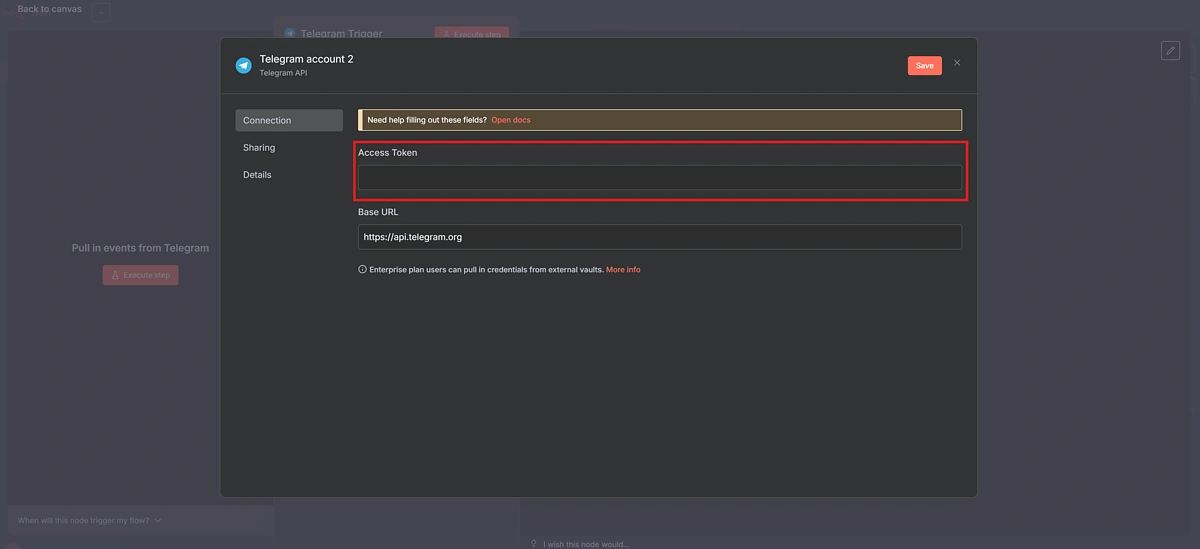
Paste the bot access token you received from BotFather earlier into the “Access Token” field. There’s no need to change the base URL. Simply click save.
With your newly created credential selected, it’s time to test our Telegram connection. We want to confirm that n8n can indeed read and receive the messages that we’re sending to our bot.
To do that, click Execute Step on the left-hand side of the screen. Note that if you’re running n8n locally and getting an error at this stage, it is likely due to a misconfigured tunnel URL.
n8n should now be listening for messages from your Telegram bot. The Botfather should have also sent a URL where you can chat with your bot. Alternatively, you can search for your bot directly in Telegram. The bot URL can also be shared publicly for anyone to access and interact with your bot.
Next, send a test message, and n8n should receive it.
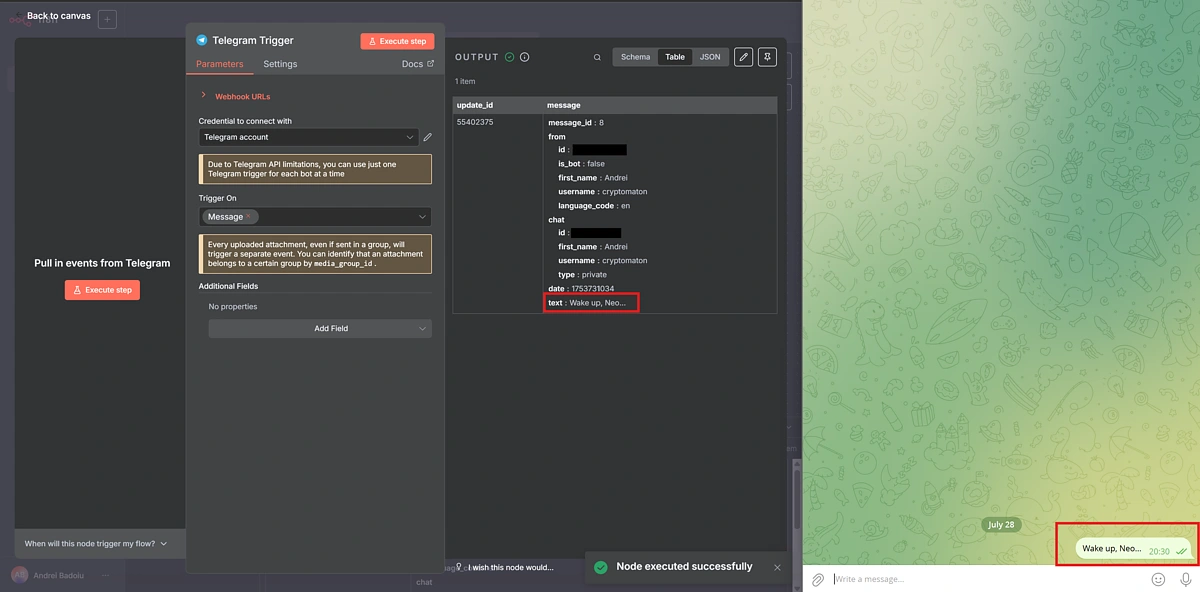
The screenshot above confirms that the trigger is working correctly. At the moment, the AI workflow will run whenever the bot receives a message, but you can fine-tune it in n8n by filtering for specific keywords or restricting it to specific users.
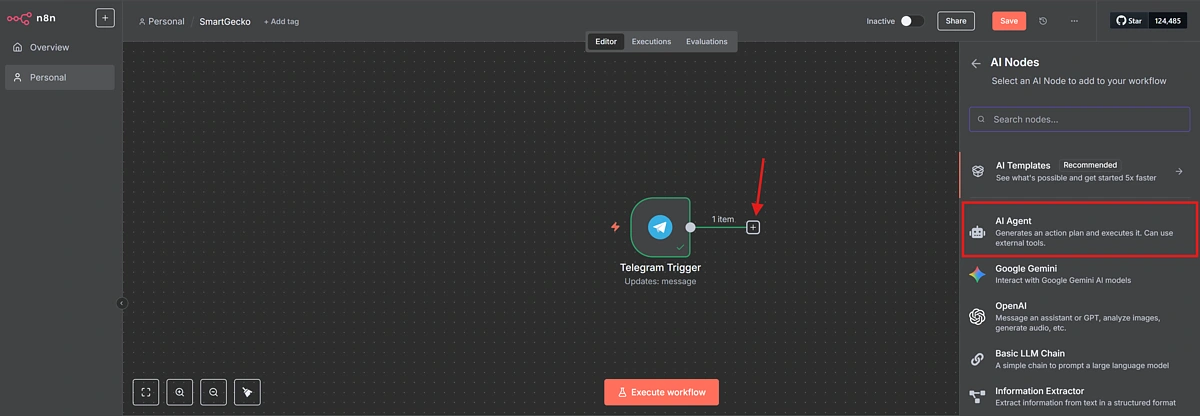
Add an AI Agent
Navigate back to the canvas, click the plus (+) icon beside the Telegram node, and then add an AI Agent node.
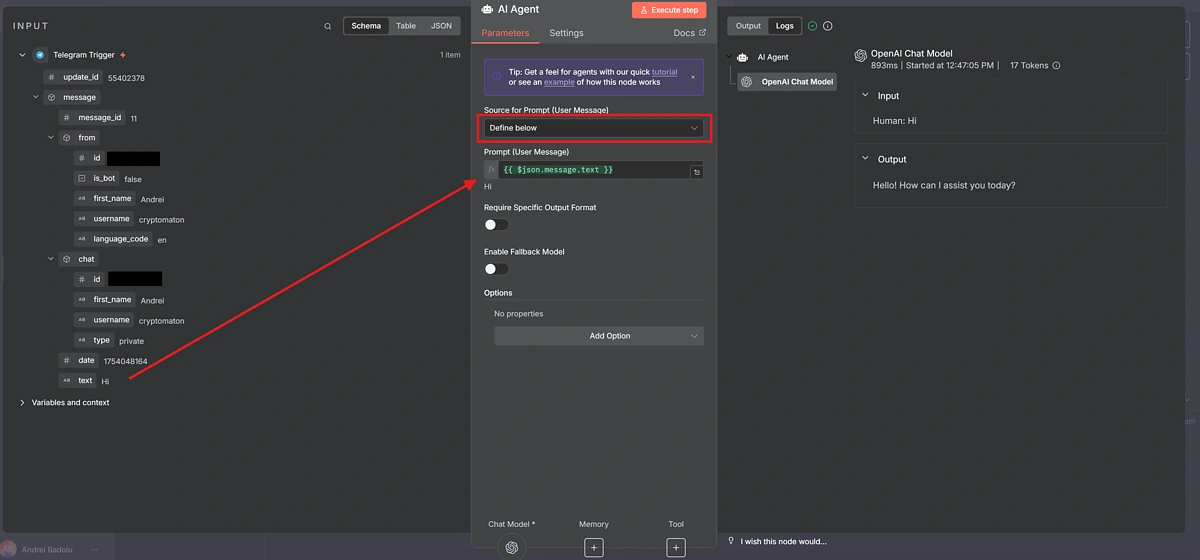
After adding the AI Agent node, a new window will appear. This is where you’ll configure the agent to process your Telegram prompt correctly.
To do this, make sure you’ve previously triggered the workflow via Telegram. You’ll then see the Telegram Trigger object in the left panel. You can then connect your agent to this trigger by dragging the Telegram message into the “Source for Prompt (User Message)” field. This tells the agent to use the message received from Telegram as an input.
Next, set the “Source for Prompt” to “Define below”, then drag the relevant text property (your Telegram message) from the left-hand panel into the “Prompt (User Message)” box as shown below.
Once that’s done, click Execute step in the top right corner. This will use your Telegram message as the prompt, send it to the OpenAI Chat Model, and display the response.
Don’t worry if you haven’t set up a Chat Model yet, we’ll cover that next.
Simply navigate back to the workflow canvas and start configuring the three sub-nodes attached to the AI Agent: Chat Model, Memory, and Tool.
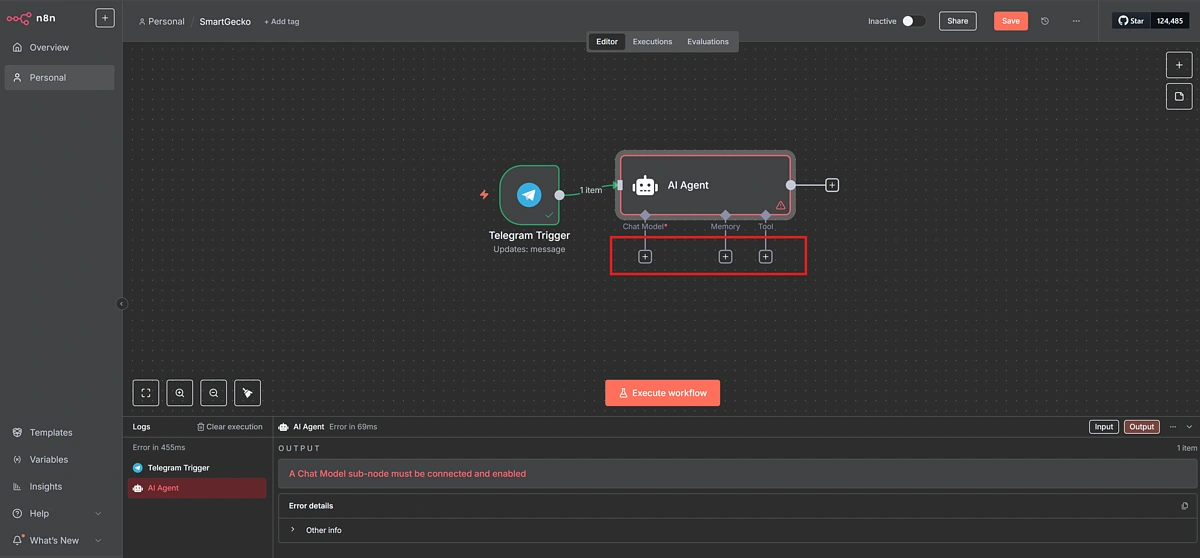
AI Agent Chat Model
To set up the Chat Model, click the plus (+) icon to add a new sub-node, then search for OpenAI and select OpenAI Chat Model.
Just like with the Telegram trigger, you’ll need to create a new OpenAI credential by entering your API key. Once it’s added, you can select it from the drop-down menu. This is also where you choose which OpenAI model you’d like to use.
Depending on your use case, you can opt for a faster or more powerful model. For this project, we’ll go with gpt-4.1-mini, which strikes a good balance between performance and speed.
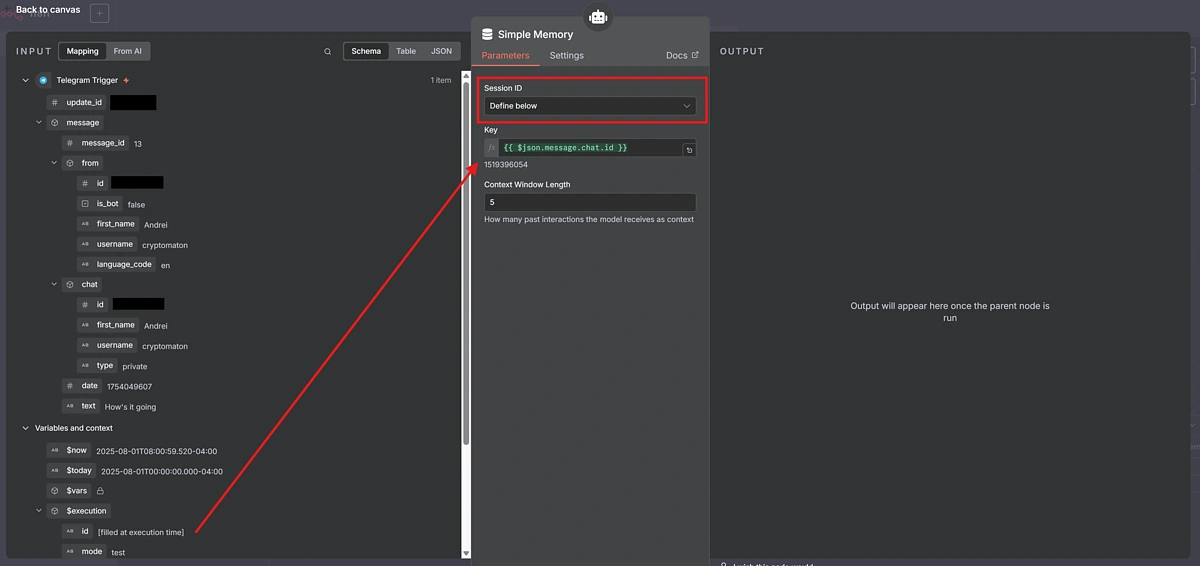
AI Agent Memory
Adding memory to your agent is optional, but it can significantly improve the model’s performance over time by helping it better understand your specific requirements.
To enable memory, click the Memory sub-node and add a Simple Memory block. This stores the conversation history locally.
You’ll need to provide a Session ID so the agent can distinguish between different chat sessions. Each Session ID must be unique, and the easiest way to achieve this is by passing the execution ID, which is unique for each workflow trigger.
Simply drag and drop the execution ID into the “Key” field.
You can also adjust the Context Window Length to control how many previous conversations the model should remember.
AI Agent Tool
In order for your AI agent to interact with real-world data or services, you’ll need to connect it to external tools. These tools act as bridges between the agent and third-party APIs, giving it the ability to fetch information and perform various actions.
For our use case, we will configure the agent to use the CoinGecko MCP.
The CoinGecko MCP allows your AI agent to query real-time cryptocurrency market data, such as prices, market caps, trading volumes, trending coins, and more. It acts as a bridge between your prompt and the CoinGecko API, enabling the model to fetch and process real-time crypto data dynamically, and generate AI-assisted responses based on that information.
Add an MCP Client from the tool list and then configure it using the CoinGecko MCP URL address: https://mcp.api.coingecko.com/sse.
Once you’ve pasted in the URL, the “Tools to include” dropdown should start populating with CoinGecko MCP tools that the agent will have access to. Depending on your use case, you may want to restrict the scope of your agent to just a couple of tools, or for a more general AI research bot, you could include “All” tools.

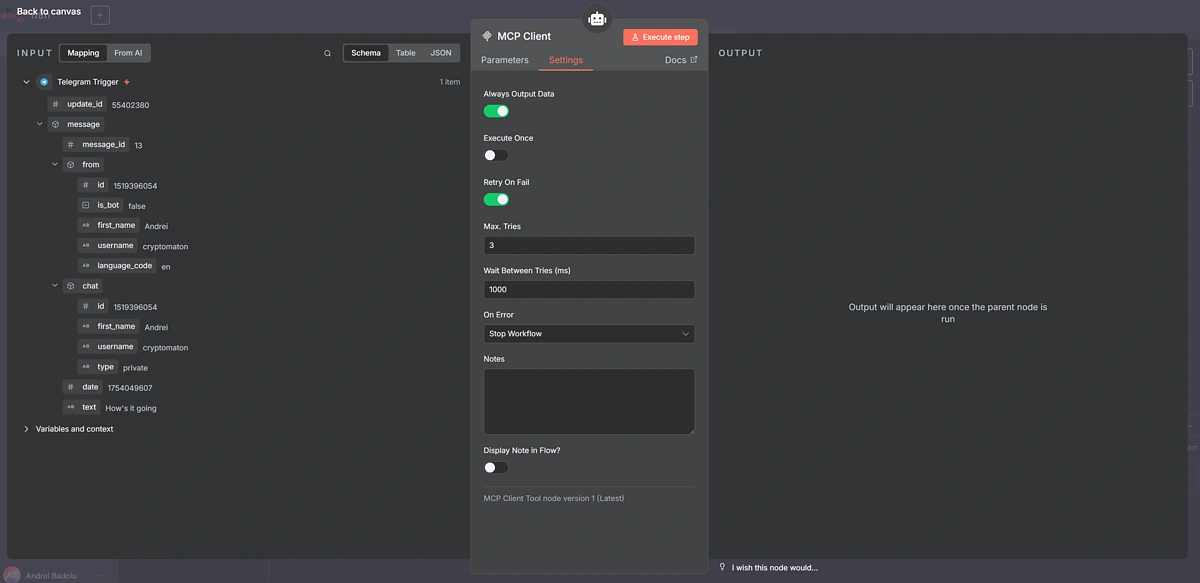
AI Agents can occasionally misinterpret responses or call the wrong tool, so consistency isn’t always guaranteed. To improve reliability and reduce errors, go to your MCP Client’s settings and enable “Retry on Fail”.
This setting allows your agent to automatically retry the task if it fails, up to the number of attempts you specify. It’s a simple way to make your workflow more robust and fault-tolerant.
You’ll also want to enable “Always Output Data” to gain better visibility into what’s happening in the background.
Add a Telegram Response Message
At this point, the flow is technically functional, but the agent still needs a way to send messages back through Telegram.
To enable replies from the agent, return to the canvas, click the plus (+) icon to add a new node, and search for “Send text“. Select the Telegram action called “Send a text message” and place it after the agent node in your workflow.
This will allow your agent to respond directly to you via Telegram.
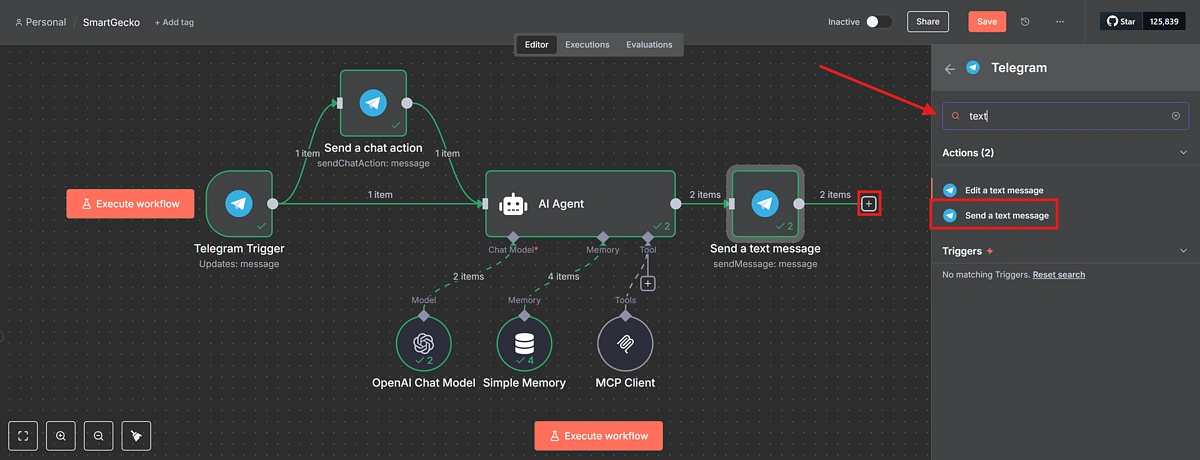
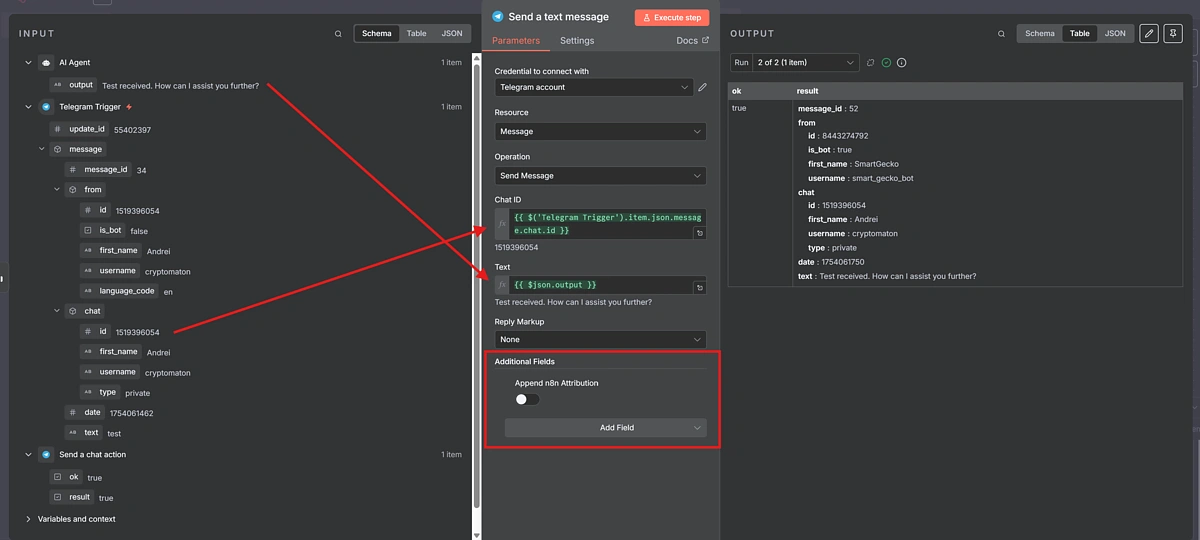
To configure this step, drag the agent’s response into the “Text” field from the AI Agent’s output.
To let the bot know which chat to reply to, drag the Chat ID from the Telegram Trigger node into the “Chat ID” field.
By default, when n8n sends a Telegram message, it adds attribution text (“Sent via n8n”). To disable this, click Add Field, select Append n8n attribution, and toggle it off.
Step 2: Testing Your AI Crypto Research Bot
Now that your setup is complete, you’re ready to activate your bot and start sending prompts directly from your Telegram chat.
Click the Inactive toggle at the top of the canvas to turn it Active, and wait for the workflow to go live. That’s it, your AI-powered crypto bot is now up and running on Telegram!
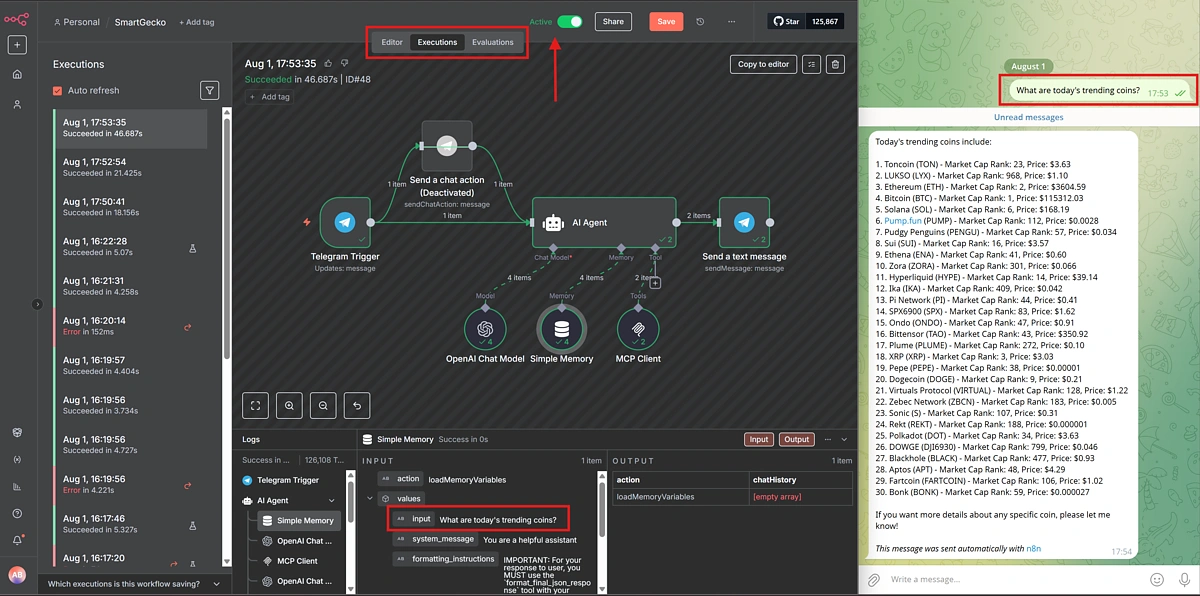
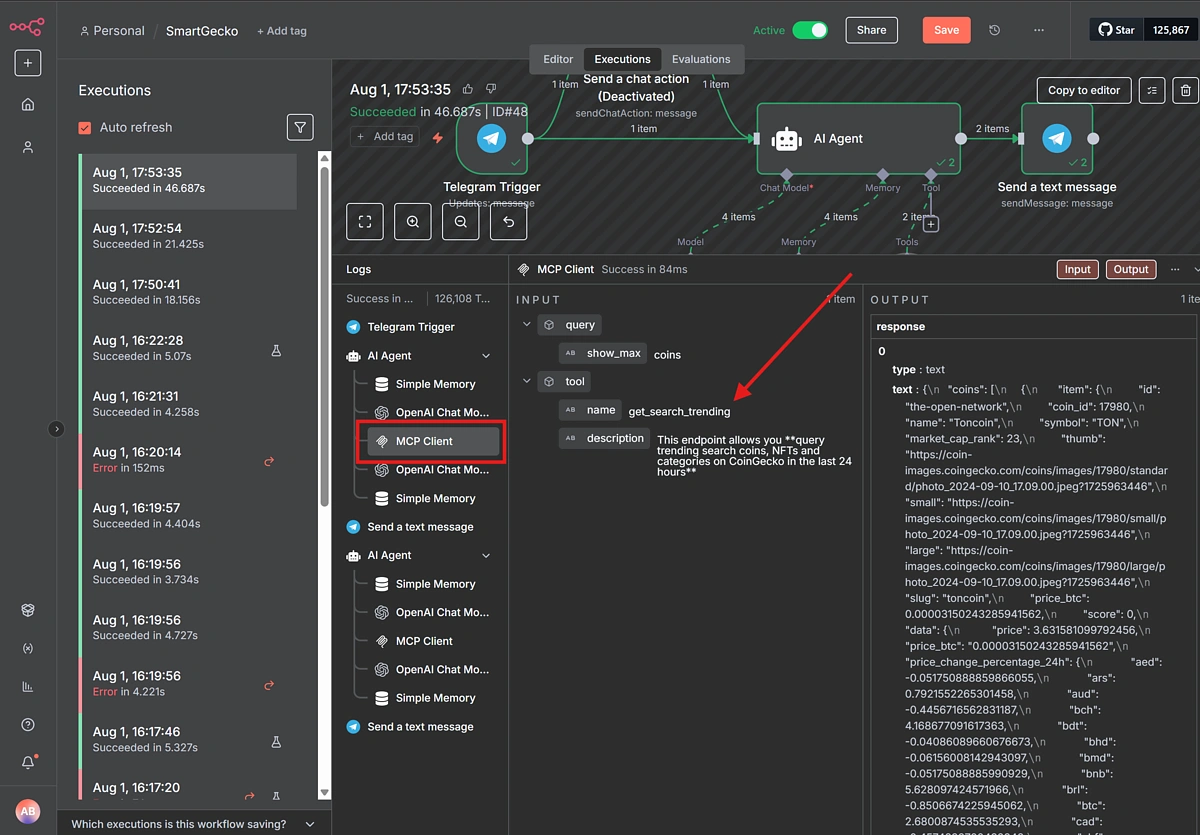
In this example, we asked the agent to fetch today’s top trending coins. To see how it processed the request, click on the MCP Client step in the Logs section.
This will open a terminal-style window showing which tool was used. In this case, it’s the get_search_trending function from the MCP toolkit, which is equivalent to the /search/trending endpoint from CoinGecko API.
You can also check the raw response in the output window to confirm that the agent’s response is as expected.
Step 3: Create System Prompts For AI Crypto Research
A system prompt is an instruction you give your AI agent to define its role, behaviour, and purpose. Think of it as the “job description” for your AI crypto bot; it sets the tone and context for how the agent should respond to inputs and what kind of output it should generate.
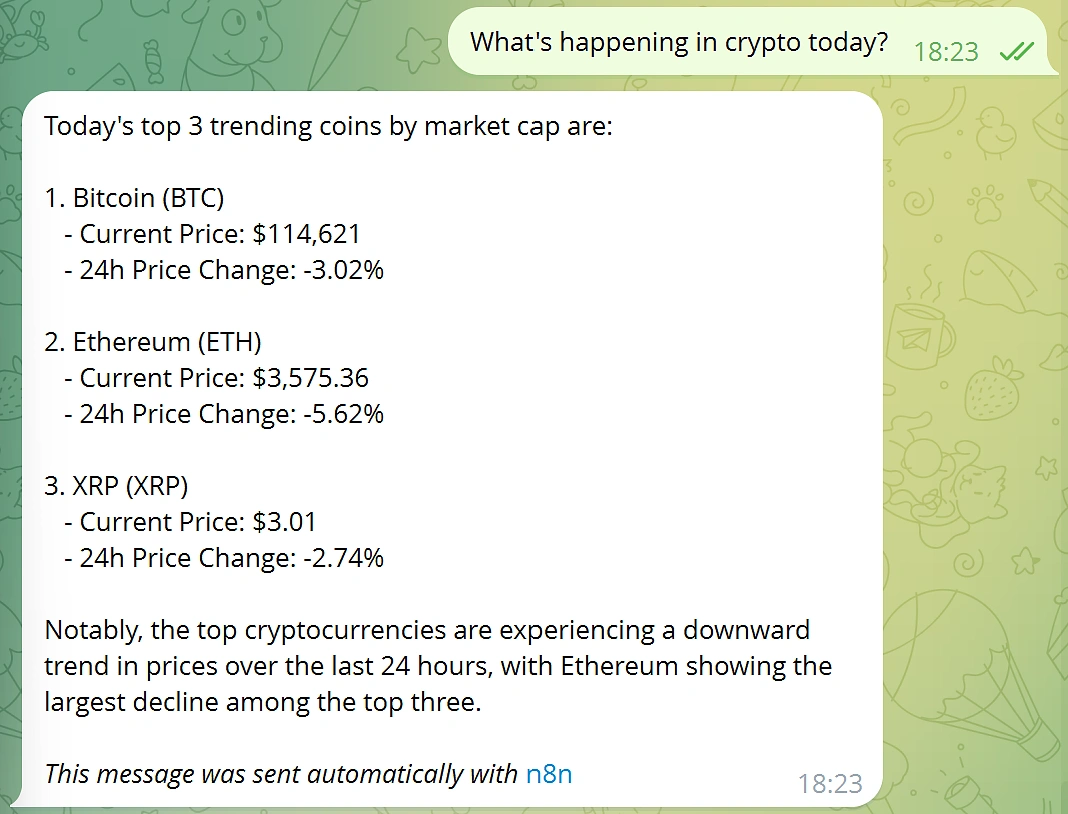
Here’s a simple system prompt you can use to create a basic AI crypto bot that searches for trending coins and provides analysis at set intervals:
“You are a crypto research assistant. Every time you’re prompted, check the top trending coins on CoinGecko. Summarise the top 3 coins, including their name, current price, and 24h price change. Provide a short sentence explaining any notable patterns or movements.“
This system prompt sets up a lightweight bot that regularly delivers bite-sized crypto insights, perfect for Telegram updates or automated research feeds.
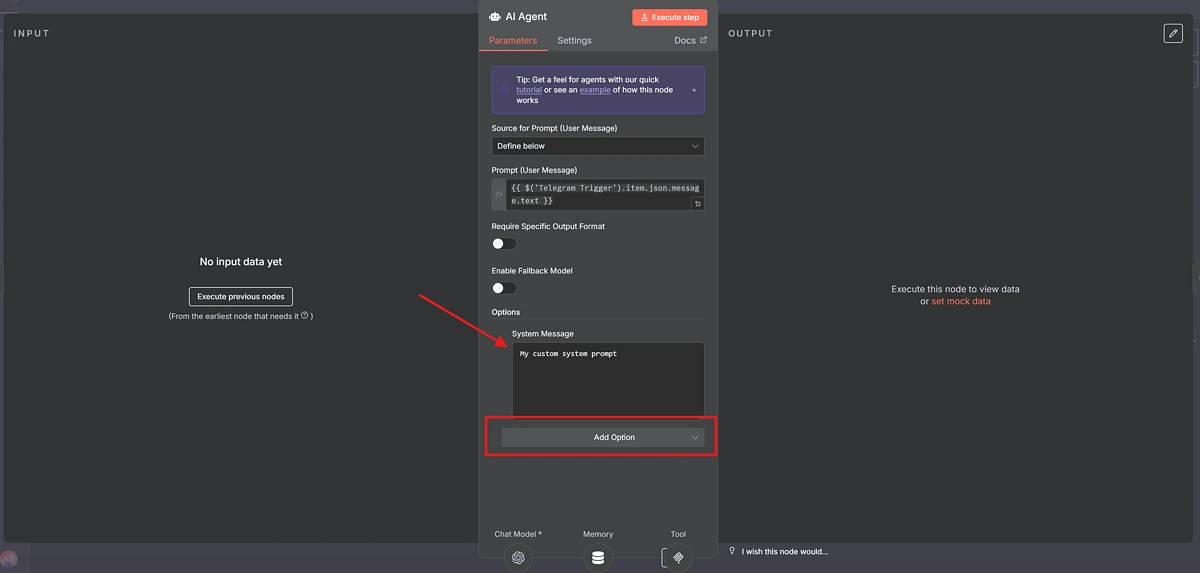
To add a system prompt and customize how the AI agent replies to your request, open the AI Agent node, click Add Option, and then modify the System Message.
Step 4: Enhancing Your AI Crypto Research Bot
Once your basic AI crypto research bot is live, you can take its capabilities even further by refining its precision, broadening its data sources, and automating more of your workflow.
A good next step is to customize your system prompt so the AI agent focuses on exactly what you need. Instead of using a generic “analyse trending coins” command, use a more specific system prompt like “fetch top trending coins on CoinGecko with a market capitalization over $500 million and gains of at least 15 percent in the past 24 hours.” Then instruct it to list each coin’s name, current price, and 24h change.
This added precision ensures the responses are tailored to your strategy, helping you cut through the noise and surface only the most relevant insights.
Below is an example of how varied the outputs can be, just by changing the system prompt.
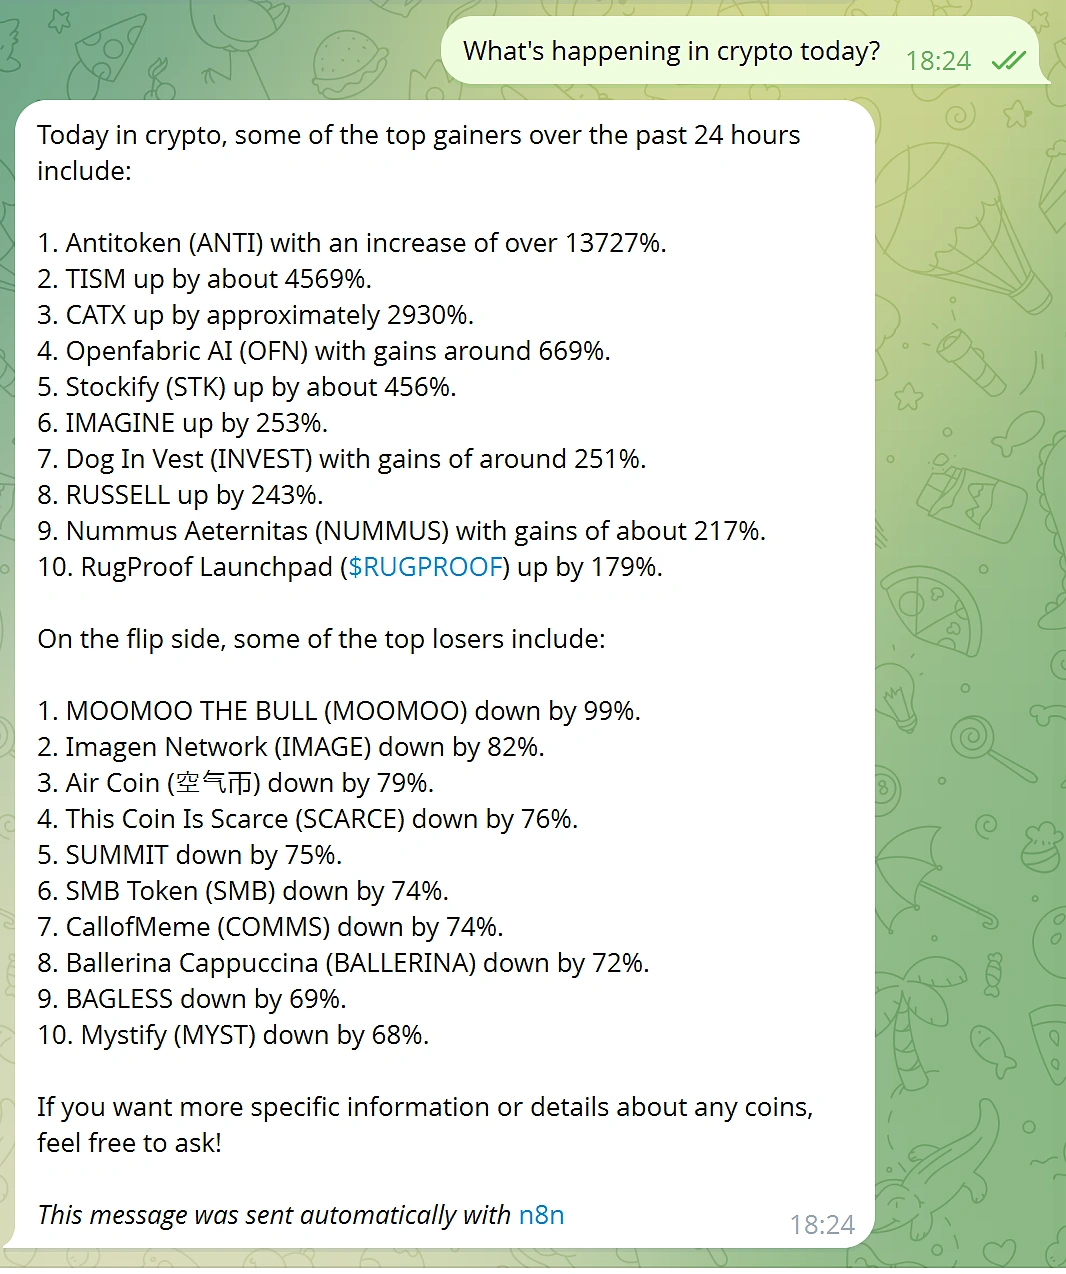
Here is the exact system prompt that was used to generate the response shown above:
“You are an expert cryptocurrency assistant. You provide short and insightful summaries on the status of the cryptocurrency market by focusing on the top 10 gainers and losers in the last 24 hours, as numbered lists.”
Next, you can enrich your analysis by integrating third-party data feeds alongside CoinGecko’s market data.
For example, add a Twitter node to pull recent tweets about your chosen coins and run a basic sentiment analysis by comparing positive and negative mentions. This helps you gauge market sentiment more effectively.
By combining CoinGecko’s on-chain and crypto data across 9 million+ tokens with social and news signals, your bot’s market intelligence becomes more nuanced and actionable.
You can also configure the bot to run on a schedule (for example, every 2 hours) instead of relying on incoming Telegram messages. Use the Schedule Trigger node to do this. It makes your crypto research bot fully automated and ensures you receive bite-sized market insights without missing a beat.
Conclusion
The CoinGecko MCP delivers real-time crypto data to AI tools and LLMs. When combined with a powerful, beginner-friendly automation platform like n8n, AI-powered crypto market intelligence becomes more accessible than ever.
Furthermore, by customizing system prompts, adding more data sources, and automating delivery, you can turn a basic research bot into a powerful, conversational assistant that goes beyond surface-level metrics.
This guide focuses on using CoinGecko’s free Public Remote MCP server, which operates under a shared rate limit. If you’re ready to get more out of CoinGecko’s MCP, consider subscribing to a paid API plan to unlock higher rate limits and access to exclusive MCP tools and API endpoints.