
Whether you are a seasoned trader building new strategies, performing market analysis, or just someone starting fresh with exploring crypto trends, having access to accurate historical price data is essential. For traders, analysts, and developers alike, OHLC and OHLCV data is usually the first step toward gaining deeper insights. This data is crucial for backtesting, visualization, time-series analysis, and as inputs for complex financial statistical models.
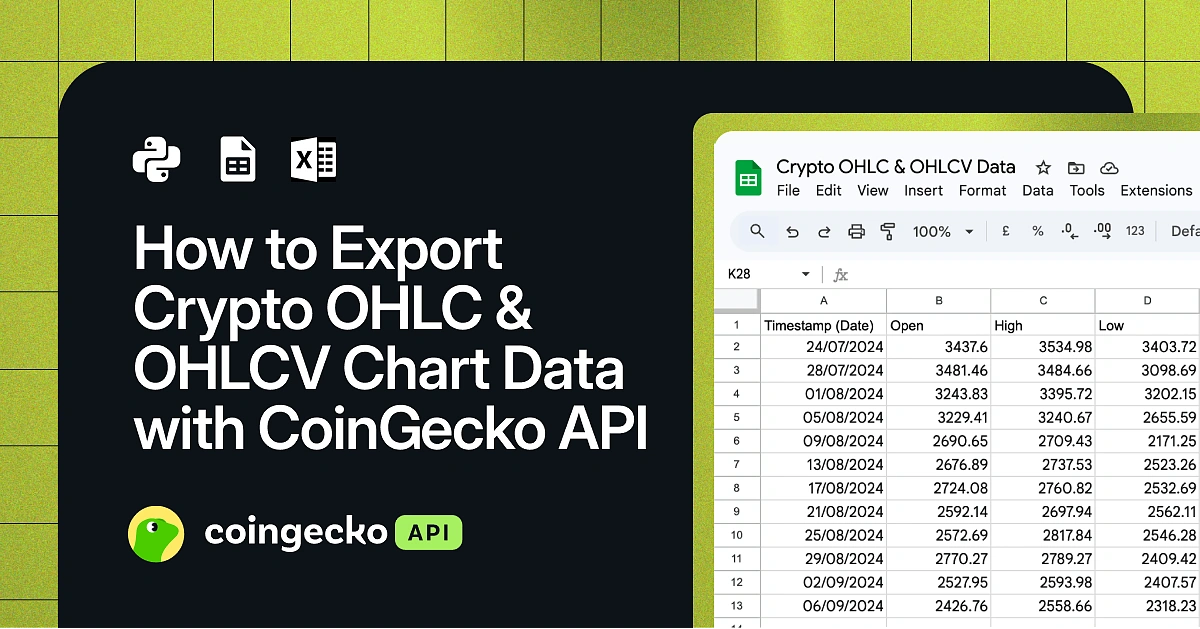
In this guide, we will show you how to use CoinGecko API with Python, Google Sheets, and Excel to download historical OHLC(V) data and save it in both CSV and XLSX file formats.
Comma Separated Values (CSV) is ideal for its simplicity and broad compatibility with tools like Excel, Google Sheets, Python, R, Julia, DuckDB or even a plain text editor. Its human-readable format makes it easy to inspect and debug data at a glance. For dedicated Excel users, having the data in .xlsx file format (instead of CSV) ensures compatibility with existing tools. Let’s dive in!
What Is Crypto OHLC and OHLCV Data?
OHLC data is a type of financial chart data that represents the Open, High, Low, and Close price of an asset for a specific time period. OHLCV data adds a fifth crucial data point: Volume, which shows the total amount of the asset traded during that period.
These data points are the foundation of technical analysis for any financial asset, including crypto.
-
Open: The price at the beginning of the period.
-
High: The highest price reached during the period.
-
Low: The lowest price reached during the period.
-
Close: The price at the end of the period.
-
Volume: The total quantity of the asset traded. High volume can indicate strong interest and confirm a trend.
For traders and analysts, an OHLC data download is necessary to feed this information into other software for backtesting strategies or performing in-depth analysis. Getting access to a reliable crypto OHLC data feed is the first step in building any serious trading model or market research tool.
Prerequisites
Python
We will make use of a Jupyter notebook as our primary Python development environment. Additionally, the following package needs to be installed:
pip install polars
Polars is a fast DataFrame library that we will use to validate, manipulate and export the data. To start coding in a new notebook, execute the following command in the terminal:
jupyter lab
This should open up a new tab in a browser. If you want to make use of the notebook shared via the GitHub repository, clone the repository first, and then open it within the Jupyter environment. Make sure to replace the paths to the API key files with your own.
💡 Pro-tip: Do not insert API keys into the notebook directly. It is a bad security practice, and you run the risk of exposing the keys in case the notebook is shared via a public GitHub repository.
CoinGecko API key
To access the API endpoints, you will need at least a Demo API key. If you don’t have one, read this guide on how to get your free Demo API key. Note that the examples presented in this article primarily use a Demo API key. However, you can also opt for a Pro API key and enjoy higher call credits and rate limits.
API Endpoints Used
We will make use of the following CoinGecko API endpoints:
-
/coins/list – Get list of supported coins on CoinGecko with coin ID, name and symbol.
-
/coins/{coin_id}/ohlc – Get OHLC data based on a given coin ID.
-
/onchain/networks/{network}/pools – Get list of top pools for a given network.
-
/onchain/networks/{network}/pools/{pool_address}/ohlcv/{timeframe} – Get the OHLCV chart data of a specified pool address on a network.
Setting Up the Project Environment and API Access
In order to have our environment set up for secure API access, we can save the keys locally to a file and read from there whenever needed. The use_demo (or the use_pro for paid API plans) header is used in the get_response function, which will make the request for us. Status code 200 indicates that the request was successful.
💡 Pro-tip: Here’s the full list of response codes and corresponding statuses that can happen when making API calls.
The URLs pointing to the public (free demo API) and Pro (paid API) are assigned to variables as shown below:
PUB_URL = "https://api.coingecko.com/api/v3"

PRO_URL = "https://pro-api.coingecko.com/api/v3"
Using the demo API endpoint /ping, we can now validate if our setup is working as expected.
get_response("/ping", use_demo, "", PUB_URL)

## Output: {'gecko_says': '(V3) To the Moon!'}
Get list of coin IDs
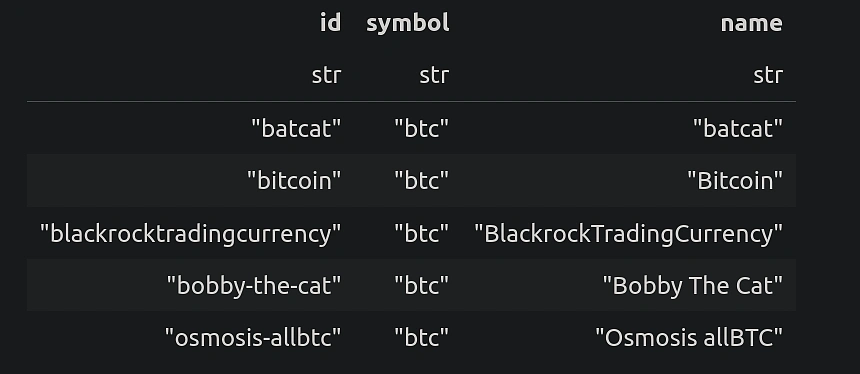
In order to make use of the OHLC API endpoint, we need to know the coin ID. While it might be straightforward to guess what the symbol could be for popular cryptocurrencies such as Bitcoin, it is important to keep in mind that there exist multiple unique IDs, for the same symbol. For example, “btc” as shown below.
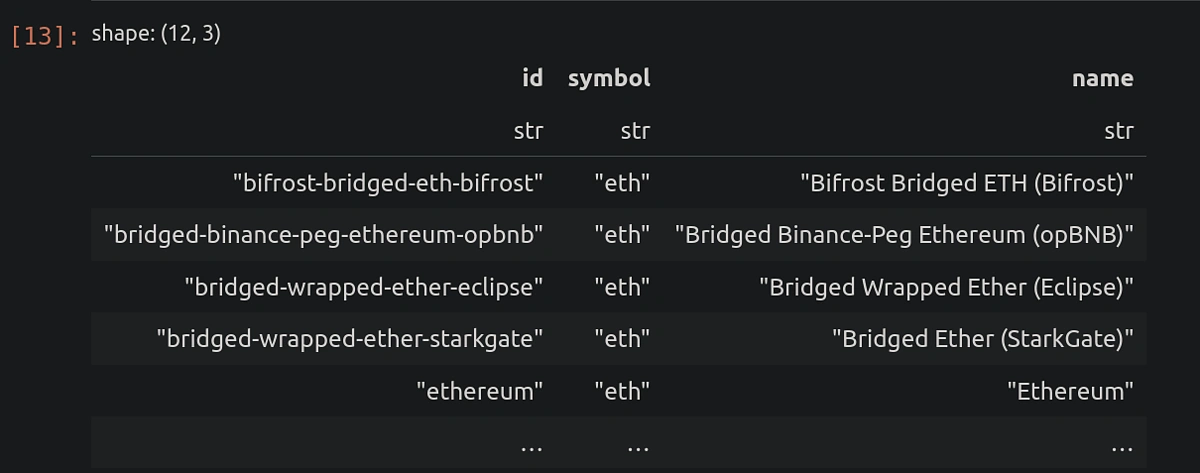
Here’s the function we can use to fetch the list of coin IDs for a given symbol such as “eth”.
After converting to a Polars DataFrame, we can now filter easily:
df_coins = get_list_of_coins()

df_coins.filter(pl.col("symbol") == "eth")
As a result, we can now see a list of unique IDs for the symbol “eth”:
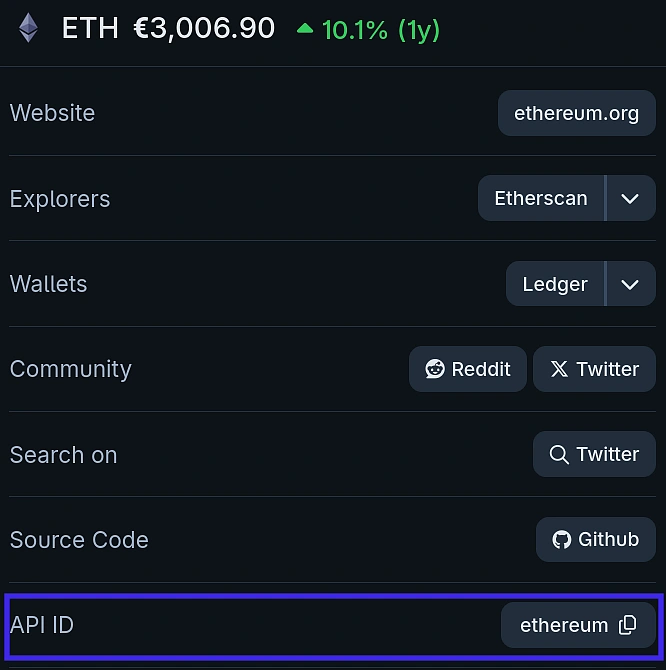
A simpler alternative method to get a specific coin ID is by visiting the individual coin page on the CoinGecko website. For example, you can copy the API ID for ETH as highlighted below by visiting the https://www.coingecko.com/en/coins/ethereum page.
How to download OHLC and OHLCV data using Python?
OHLC Data
We will make use of the /coins/{coin_id}/ohlc API endpoint to retrieve OHLC data for a given coin ID. Additionally, we can specify the following additional parameters:
-
“vs_currency”: Target currency in which price data will be reported.
-
“days”: Time period for historical data.
-
“precision”: Number of digits after the decimal for price data.
-
“interval”: Controls data granularity, we will leave it empty to enable auto selection based on time period.
The function below takes the additional parameters as input arguments. We will also convert the timestamp column into the DateTime format for easier readability.
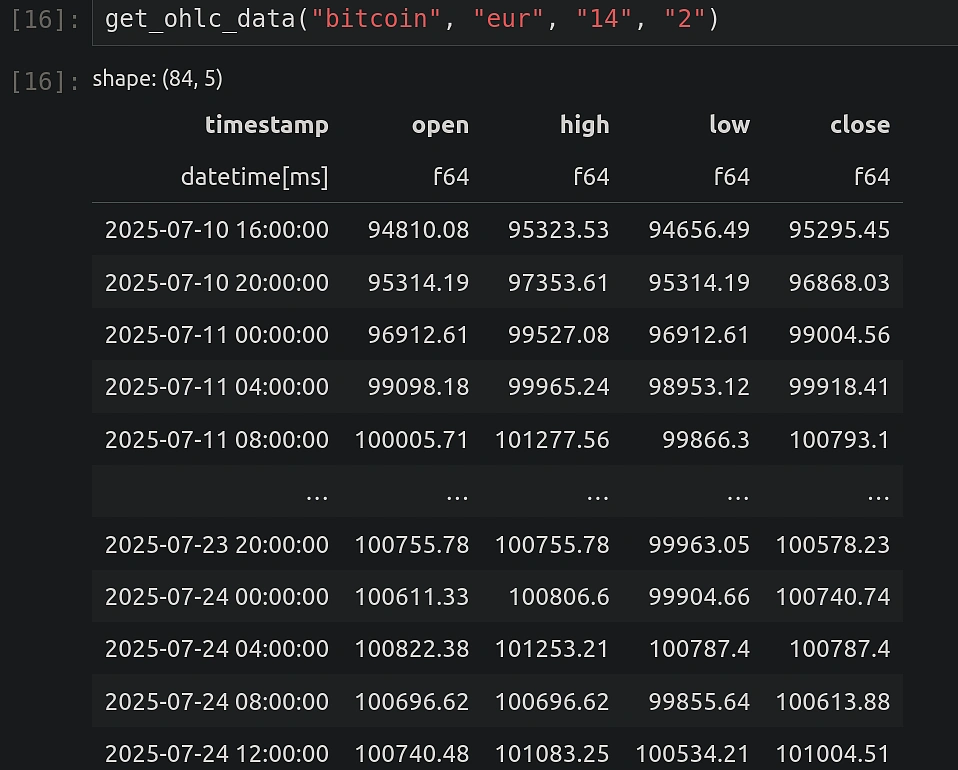
Here are the results for BTC-EUR prices in the last 14 days (query run on 2025-07-24):
Looking carefully at our OHLC function from before, you will notice that we have assigned the columns “open”, “high”, “low” and “close” in a certain order. While the timestamp column is easier to identify, the rest can easily be mixed up. Using Polars’ powerful expression capabilities, we can quickly validate if the columns have been assigned correctly. We will validate that the column “high” has the highest and “low” the lowest value for every row using the function below.
Let’s test it for a data set over a longer time period, for example 365 days.

df_export = get_ohlc_data("bitcoin", "eur", "14", "2")
df_export.write_csv("/home/vikas/Desktop/GitHub/CoinGecko_export_data/BTC_EUR_export.csv")

df_export.write_excel("/home/vikas/Desktop/GitHub/CoinGecko_export_data/BTC_EUR_export.xlsx", autofit = True)
The write_excel method provided by Polars has tons of customization options available which can be passed as additional arguments. Some notable ones are:
-
position = “B5” (Denotes cell notation as used by spreadsheet programs to start writing the data)
-
column_formats = {“timestamp” : “dd/mm/yyyy”}
-
column_totals = {“num”: “average”}
-
autofit = True (fixes column widths based on the data)
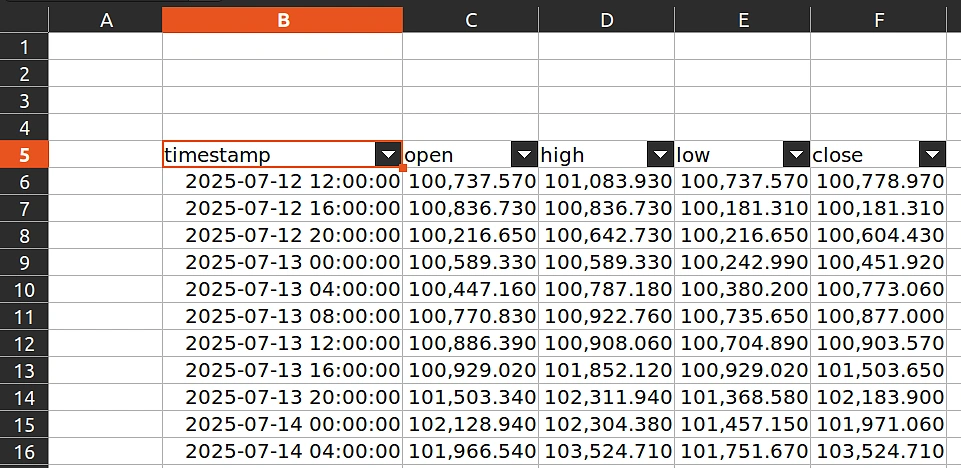
Let’s test one of the options to see the impact on the exported file. We use position = “B5” as shown below:
df_export.write_excel("/home/vikas/Desktop/GitHub/CoinGecko_export_data/BTC_EUR_export_B5.xlsx",
autofit = True,
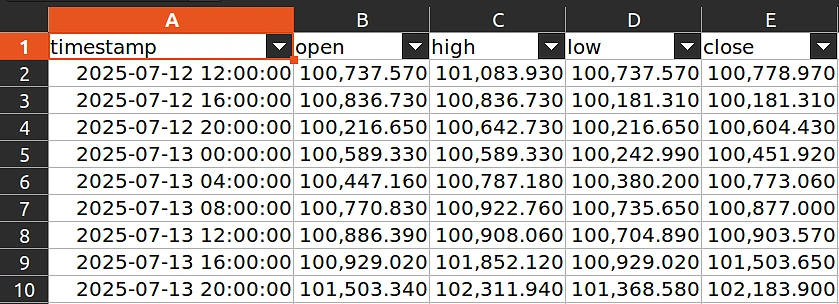
position = "B5")An example of default export where data is written starting from cell “A1”:
An example of customized export where data is written starting from cell “B5”:
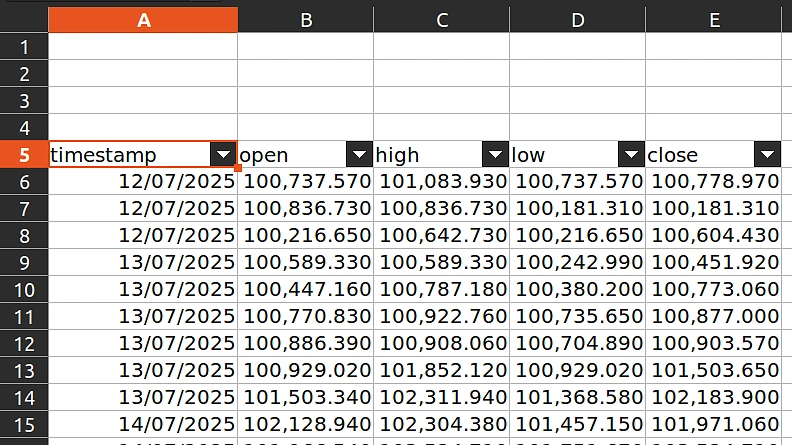
The “column_formats” option can be used to change the timestamp format as shown below:
df_export.write_excel("/home/vikas/Desktop/GitHub/CoinGecko_export_data/BTC_EUR_export_date_format.xlsx",

                      autofit = True,

                      position = "A5",

                      column_formats = {"timestamp" : "dd/mm/yyyy"})
Example of customized export where data is written starting from cell “A5” and timestamp configured to “dd/mm/yyyy” format:
OHLCV Data
Next, we will make use of the /onchain/networks/{network}/pools/{pool_address}/ohlcv/{timeframe} API endpoint to fetch OHLCV data for a given network and pool address. Before we dive into the specifics of the data itself, let us first take a look at how we can determine which network and pool address to use.
As an example, we will first determine the top pools for a specific network using the /onchain/networks/{network}/pools API endpoint.
We will parse the response and collect the relevant fields individually.
💡 Pro tip: To make use of the Pro API, you can update the input arguments to
use_pro and PRO_URL respectively.Let’s find out which are the top 5 pools in terms of “daily_volume” for the “ethereum” network. Below is the result of a list of top 5 pools for “ethereum” in descending order of daily volume:
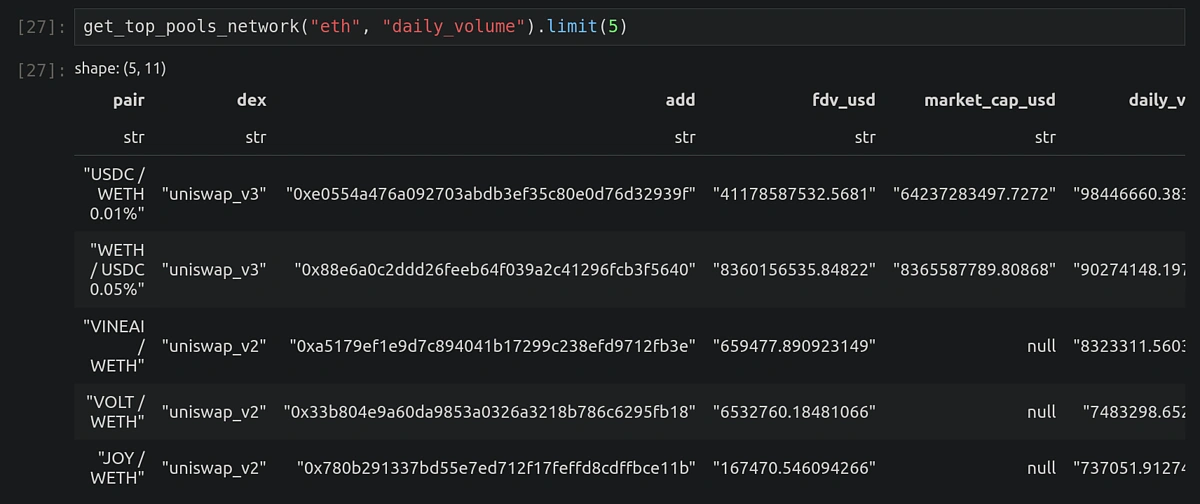
💡 Pro-tip: Setting Polars configuration “pl.Config.set_fmt_str_lengths(200)” at the beginning of the Jupyter notebook allows rows with long strings (such as pool addresses) to be completely visible. This will make it easy to copy a given address.
Now that we know how to find a relevant pool address, let’s learn how to retrieve the OHLCV data. Note the following additional parameter:
-
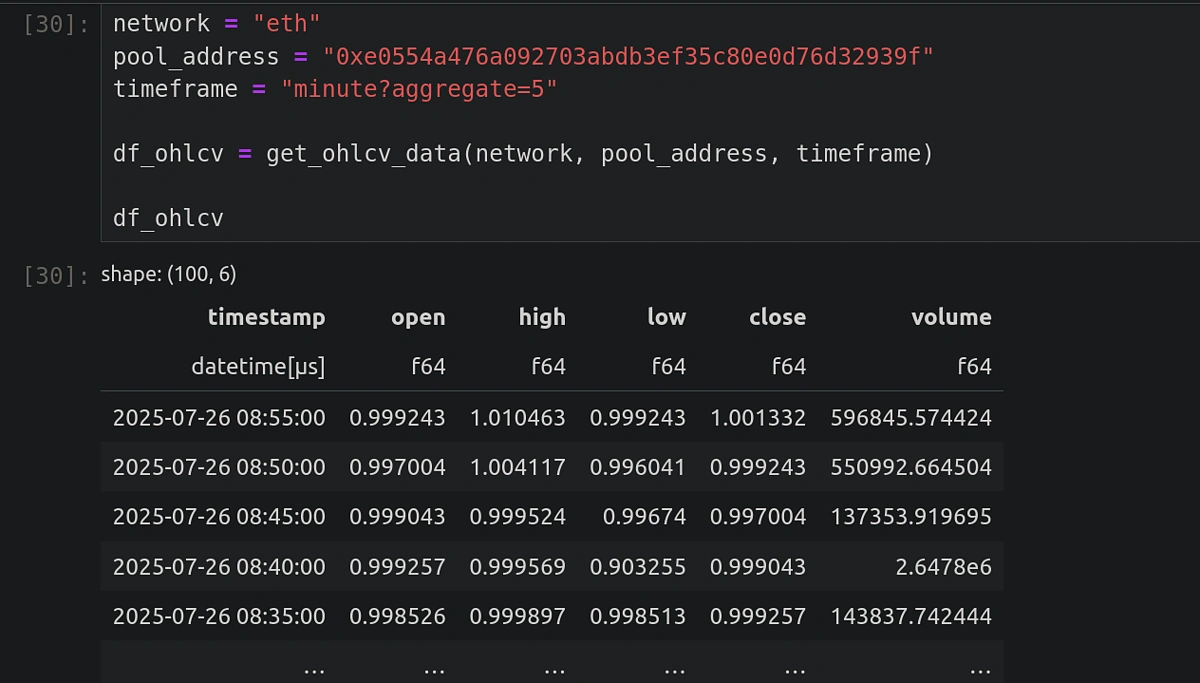
“timeframe”: Period with aggregation to get OHLCV data. For example, “minute?aggregate=5” will return historical data aggregated over every 5 minutes.
The function below takes the above additional parameter as an input argument. Also, we convert the timestamp column (reported as UNIX epoch in unit “s”) into the DateTime format for easier readability.
Running the query for the top pool address from our previous example, we get the OHLCV data with the expected aggregation as shown below:
Now, onto the final step. We can easily export the data to CSV or XLSX as shown below. Customization options for tuning the format will be the same as shared earlier.
df_ohlcv.write_csv("/home/vikas/Desktop/GitHub/CoinGecko_export_data/OHLCV_export.csv")

df_ohlcv.write_excel("/home/vikas/Desktop/GitHub/CoinGecko_export_data/OHLCV_export.xlsx",

                      autofit = True)
How to download OHLC and OHLCV data into Google Sheets?
OHLC Data
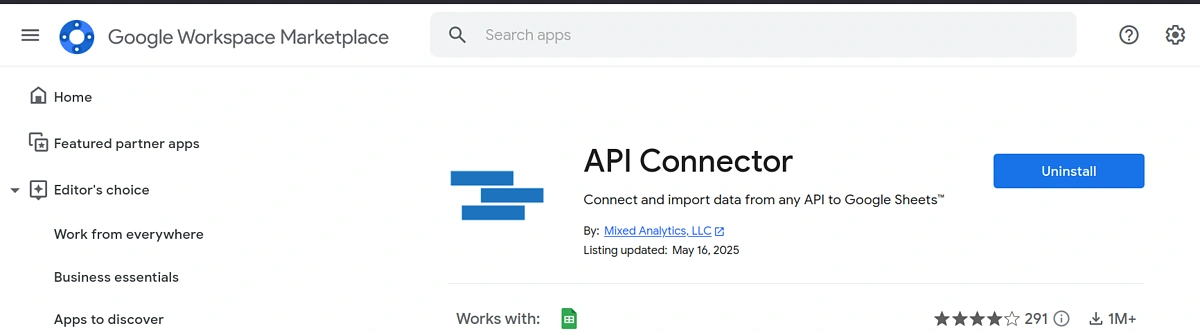
The easiest way to download OHLC data directly into a Google Sheets is using an API Connector. Read this detailed guide on how to set-up an API Connector in Google Sheets. Once you have successfully installed and set-up the API Connector, proceed with the steps below.
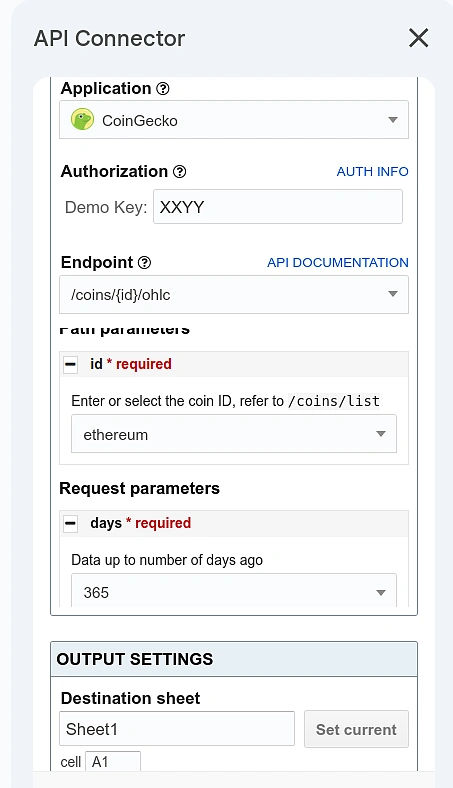
We will make use of the API Connector Google Sheets extension to fetch OHLC data with the same set of parameters as done earlier using Python.
Below are the settings used for fetching the OHLC data for “eth-usd” pair for the last 365 days with a decimal precision of 2. Replace the demo key field with your demo API key.
Example result after running OHLC API request:
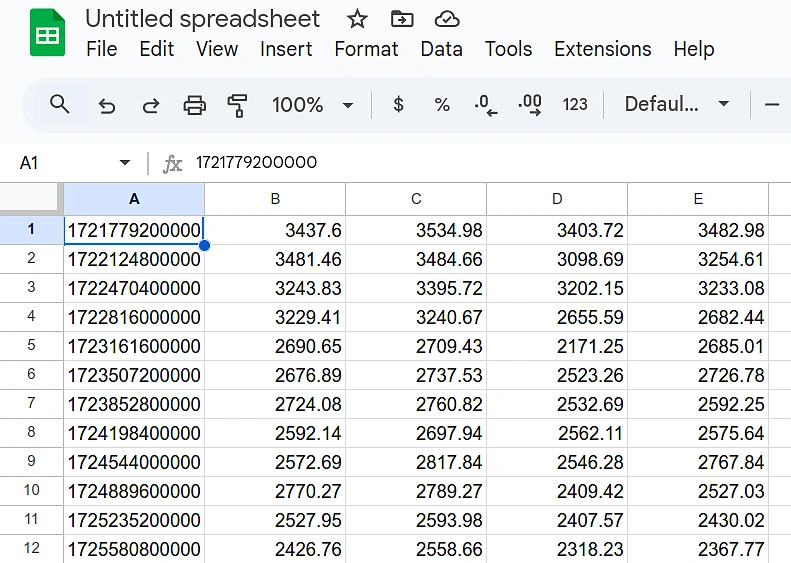
To convert the column A from UNIX epoch timestamp (unit of ms) to a human-readable date format, we can use the formula:
=({cell}/86400000 + DATE(1970,1, 1))The connector settings can also be easily saved for future reuse.
OHLCV Data
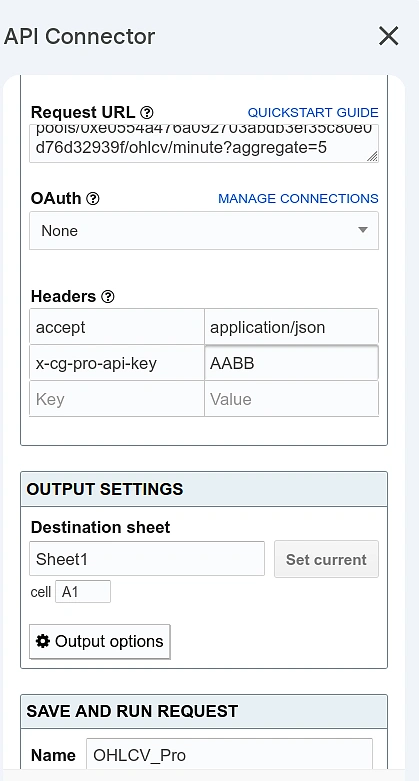
Unlike the OHLC endpoint, the OHLCV endpoint for getting on-chain data is not present in the list of readily available integrations. To deal with such cases, we will need to create a custom request.
Open the API Connector extension and click on “Create request”. In the application menu, make sure that “Custom” is selected. We can now specify the input parameters similar to how we have set them up earlier in our Python code. Here’s how they need to be filled in:
-
For Demo API Key
-
Request URL:
https://api.coingecko.com/api/v3/onchain/networks/{network}/pools/{pool_address}/ohlcv/{timeframe} -
Headers:
-
"accept": "application/json" -
"x-cg-demo-api-key" : “enter_your_demo_key”
-
-
-
For Pro API Key
-
Request URL:
https://pro-api.coingecko.com/api/v3/onchain/networks/{network}/pools/{pool_address}/ohlcv/{timeframe} -
Headers:
-
"accept": "application/json" -
"x-cg-pro-api-key" : “enter_your_pro_key”
-
-

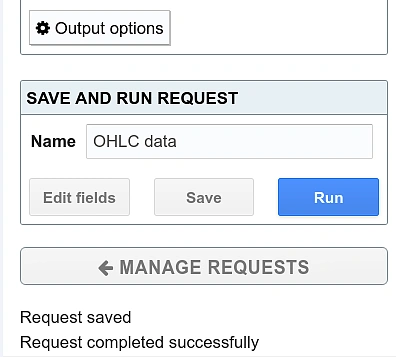
Now save and run the request to get OHLCV data.
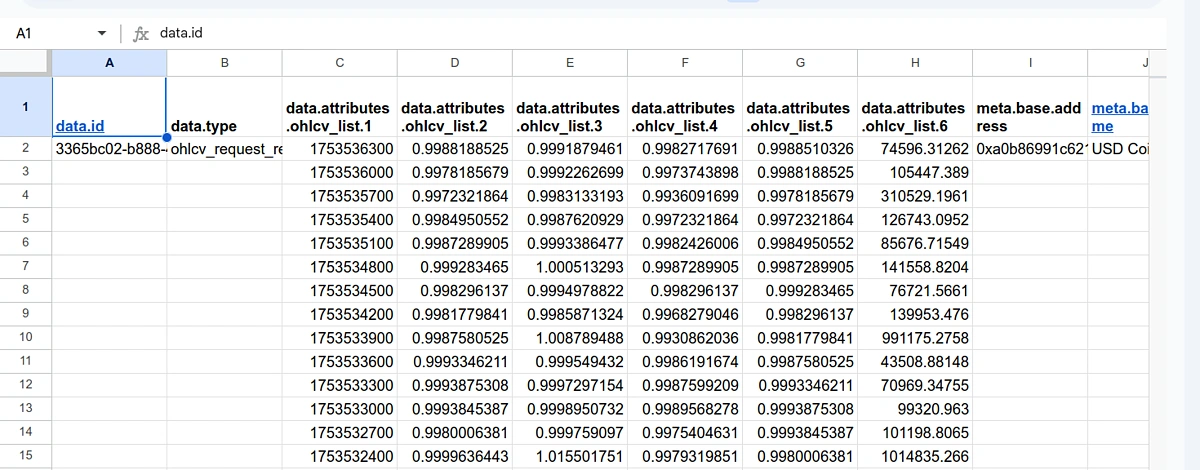
The data should appear in the spreadsheet as shown below.
How to download OHLC and OHLCV data into an Excel spreadsheet?
OHLC Data
To fetch OHLC data, we will need to first generate the API request with all input parameters and then edit the response. This can be done via the following steps:
-
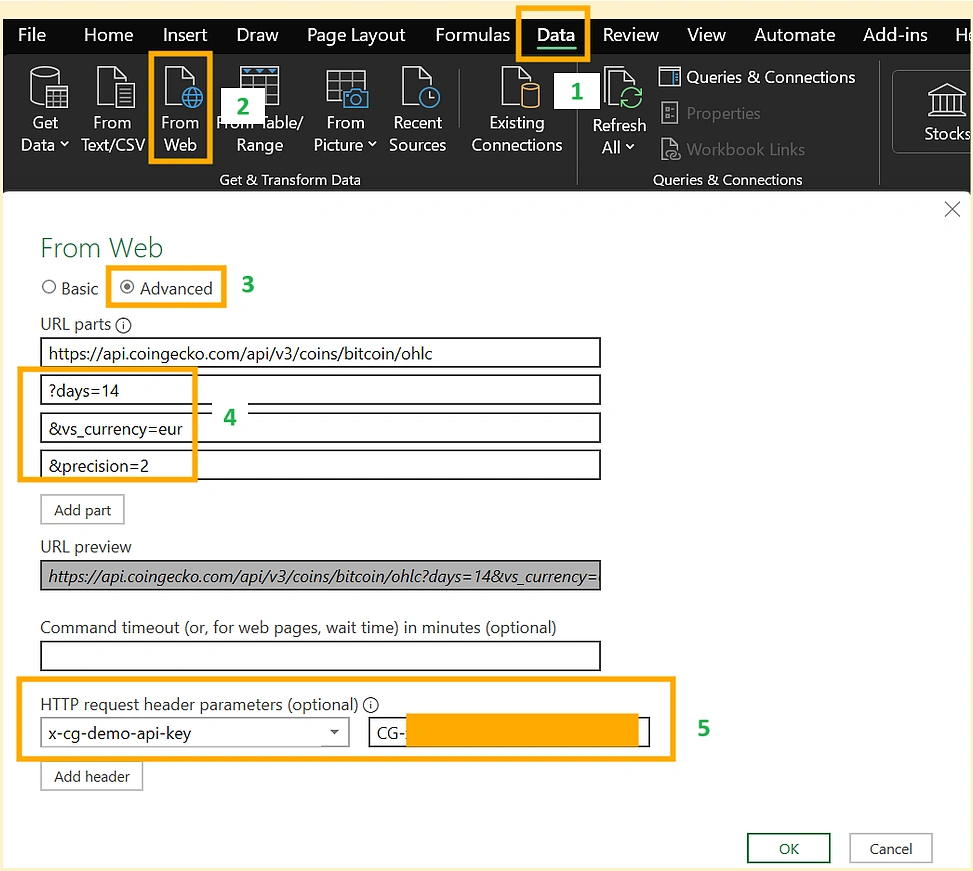
Open a blank Excel sheet and switch to the “Data” tab.
-
Click on “From Web” and a dialog box should appear.
-
Switch to the “Advanced” mode.
-
Copy and paste the base URL along with the coin ID of interest (“bitcoin” in this case). Note that the URL corresponds to the demo API. Additional parameters for customizing the output can be added as URL parts for better clarity.
-
In the HTTP request header tab, add the header name “x-cg-demo-api-key” and then the corresponding demo key.
-
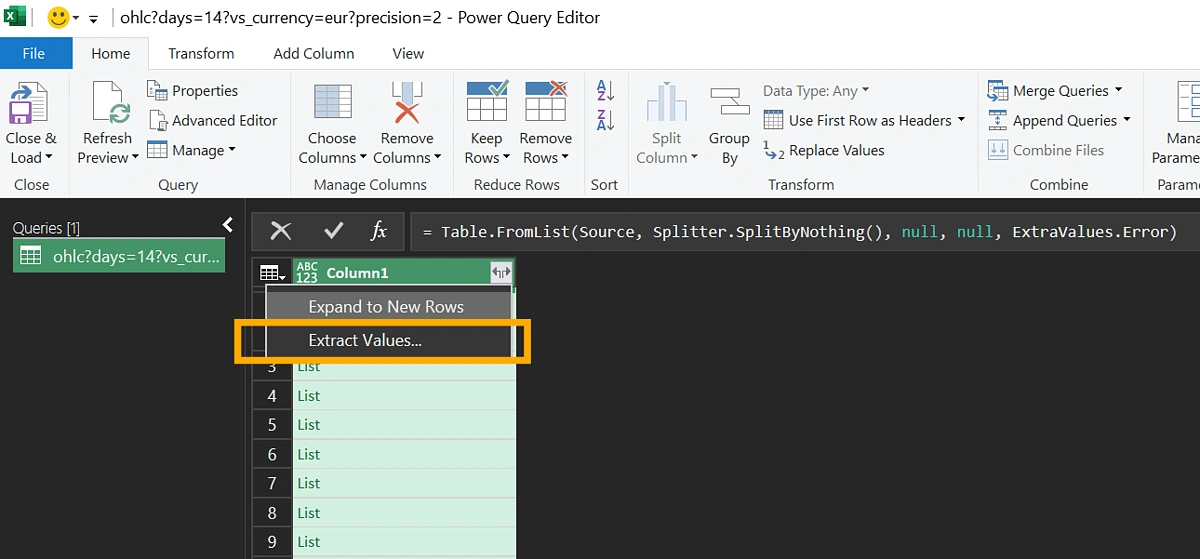
Click on OK and a new Power Query Editor window will open. Select “To Table” at the top left corner window. If a pop-up asking for a delimiter appears, you can ignore it for now.

-
Click on the small icon on the top-right of the Column1 header (it looks like a small box with an arrow – the “Expand” icon) and select “Extract Values…”.
-
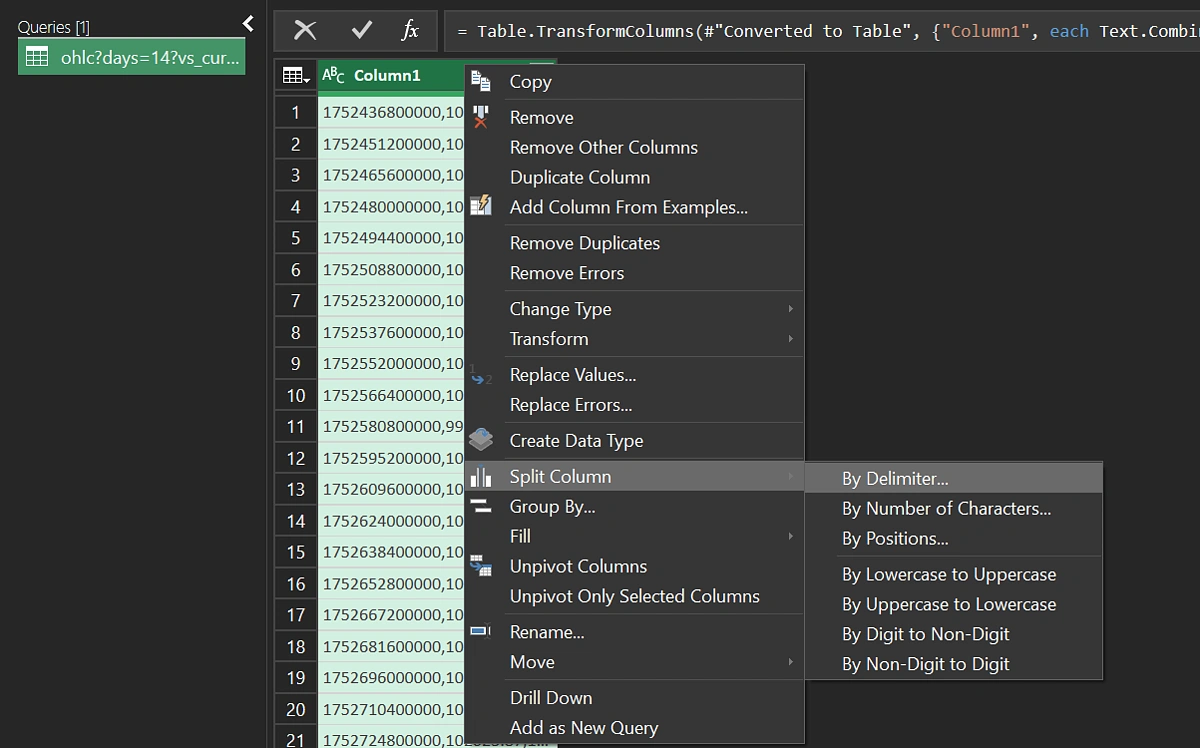
All values from every list will now appear in separate rows. Right click the column header and select “Split Column” → “By Delimiter…” → Select comma as the delimiter.
-
Rename the columns (right click column header and select “rename”) and finally click on “Close & Load” on the top left. The data should now be loaded into the spreadsheet.
-
The timestamp column in UNIX epoch can be converted to easily readable DateTime format by using the formula below and changing the column type to “Short Date”.
Formula: =({cell}/86400000+DATE(1970,1,1)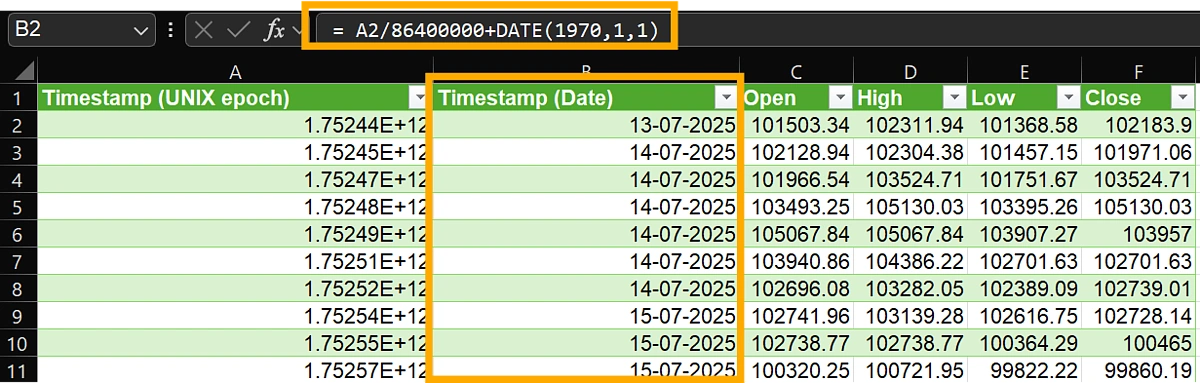
OHLCV Data
For OHLCV data, the steps to create an API request will be similar to that of OHLC as shown in the previous section.
Enter the following URL and replace the parameters accordingly:
https://api.coingecko.com/api/v3/onchain/networks/{network}/pools/{pool_address}/ohlcv/{timeframe}
The complete URL will look like the following: https://api.coingecko.com/api/v3/onchain/networks/eth/pools/0xe0554a476a092703abdb3ef35c80e0d76d32939f/ohlcv/minute?aggregate=5
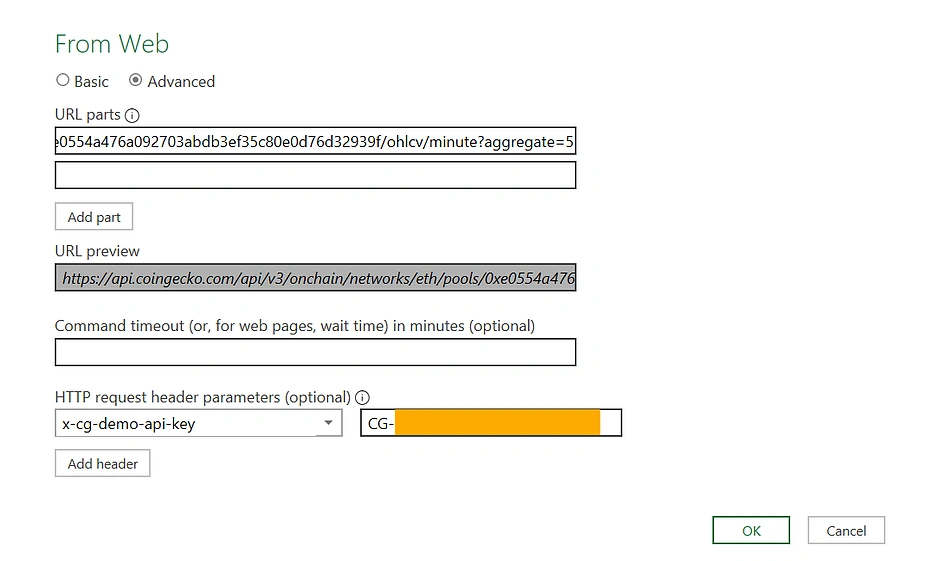
If a popup appears asking for access type/account, you can select “Anonymous”.
💡 Pro tip: If you wish to use the Pro API key, make sure to update the URL to “https://pro-api.coingecko.com” and the HTTP request header parameter to “x-cg-pro-api-key”.
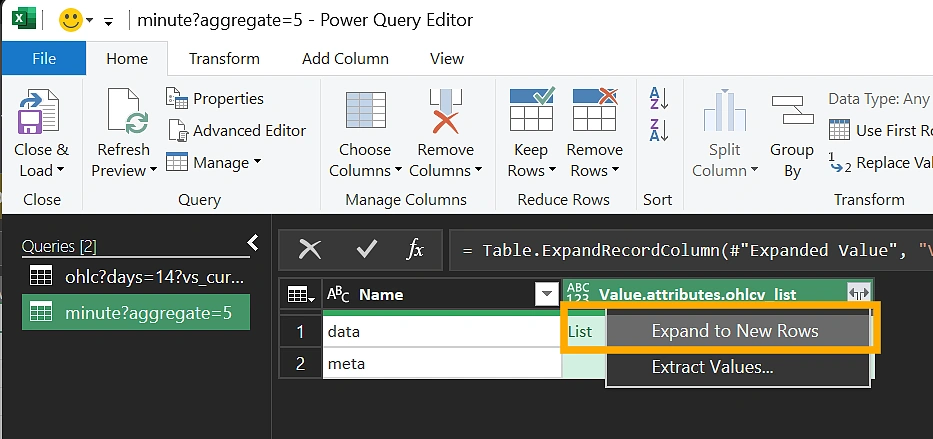
The response data structure for the OHLCV endpoint is different from our previous example. Hence, we need to do a few additional transformations within the Power Query editor.
-
Transform to table within Power Query and click on the small icon on the top-right of the Value header (it looks like a small box with an arrow – the “Expand” icon) and select column “attributes”.

-
Next, expand “ohlcv_list” into new rows with the delimiter selected as comma.
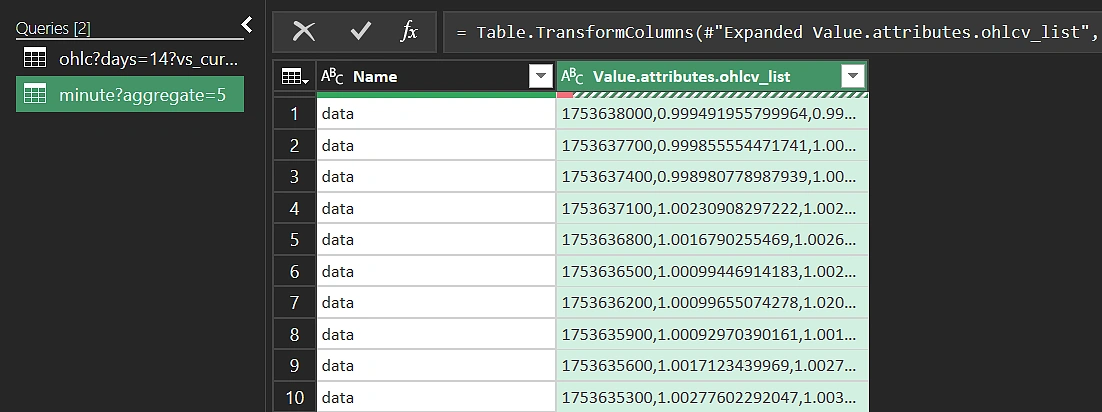
-
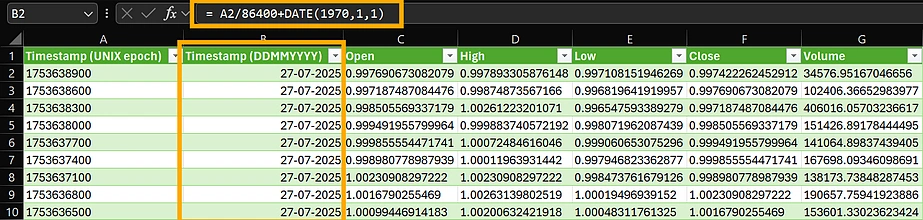
We now have a single column where data fields (timestamp, open, high, low, close, volume) are concatenated using commas. We can split it into different columns.
-
Right click the column header and select “Split Column” → “By Delimiter…” → Select comma as the delimiter. Also add 6 as the number of columns expected.
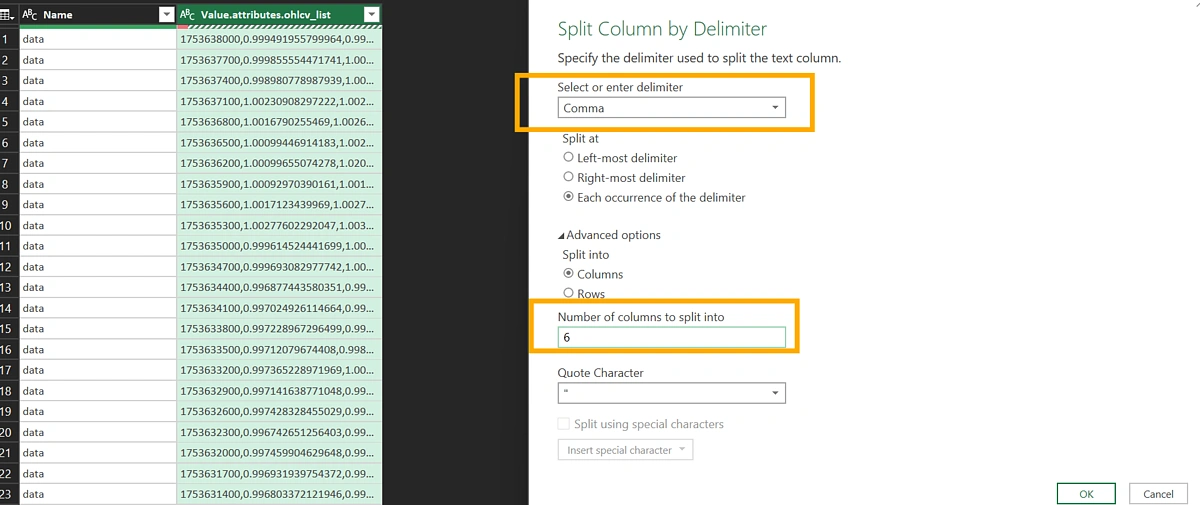
-
Rename the columns (right click column header and select “rename”) and finally click on “Close & Load” on the top left.
- The timestamp column in UNIX epoch can be converted similarly to how it was shown for OHLC data. Keep in mind that the epoch is in seconds, hence the formula needs to be
= {cell}/86400+DATE(1970,1,1).
Conclusion
In this step-by-step guide, we learned how to combine CoinGecko API with different tools such as Python, Google Sheets and Excel in order to export historical OHLC and OHLCV data to CSV and XLSX files. Python provides a lot of flexibility in the ability to customize the format of the exported file depending on specific use cases. Using Google Sheets or Power Query via Excel is a viable option for those who are not very experienced with programming.
Although this guide primarily focused on using our demo API keys and endpoints, switching to a Pro API key is as easy as updating the base URLs and authorization headers.
If you’re ready to make the most of CoinGecko API, consider subscribing to a paid API plan to unlock higher rate limits and access to exclusive API endpoints.